Welcome to today’s post.
In today’s post I will show how you can install, integrate, and use the Font Awesome library within components within your Angular application.
If you have already used a theme such as Bootstrap on an of your web applications, then you may already have experienced using Font Awesome as it is included within the Bootstrap CDN, which is used via a live HREF link to the CSS files.
Even if you do not use Bootstrap within your Angular application, you can still use Font Awesome. I will show how this is achieved.
I will first go through the installation instructions.
Installation of FontAwesome in Angular
In your Visual Code terminal, run the following NPM commands:
npm install @fortawesome/fontawesome-svg-core
and
npm install @fortawesome/free-solid-svg-icons
The package.json dependencies will be updated as shown:
"@fortawesome/fontawesome-svg-core": "^1.2.35",
"@fortawesome/free-solid-svg-icons": "^5.15.3",
The version of Angular of your project will determine the version of font awesome to install.
From my package.json file I can see the following angular version:
"@angular/core": "~8.1.2",
The above version will correspond to font awesome version of 0.5.0 (Do not use 0.4.1.2 or 0.5.1.2 for Angular 8.x as those font awesome versions are obsolete).
If you are using Angular version 6.x or 7.x, then the font awesome version will be 0.3.x. If you are using Angular version 8.x, then the font awesome version will be 0.5.0. (refer to releases here).
If you are using Angular version 9.x, then the font awesome version will be 0.6.x.
If you are using Angular version 10.x, then the font awesome version will be 0.7.x. For other versions refer to the version compatibility table here.
Now install the version applicable to your angular version using the command:
npm install @fortawesome/angular-fontawesome@<version>
In my application it will be:
npm install @fortawesome/angular-fontawesome@0.5.0
My package.json will be updated as shown:
"@fortawesome/angular-fontawesome": "^0.5.0",
Configure Angular to use FontAwesome Icons
Next, I will show how to configure your Angular application to import and use the font awesome icons in an interface component.
The first task is to add the package module reference to app.module.ts as shown:
import { FontAwesomeModule } from '@fortawesome/angular-fontawesome';
…
@NgModule({
  declarations: [
    …
  ],
  imports: [
    …
    FontAwesomeModule,
    …
  ],
  providers: [
    …
  ],
})
export class AppModule { }
For the next task, open the component you wish to use the fonts, then import the icons you wish to use. Before doing this, it would be helpful to search for the icons you intend to use from the font awesome site. Each icon has a corresponding identifier. For example, a bar chart icon has the identifier faChartBar. Below is an import for three icons I will be using in my menu tile component:
import { faList, faSearch, faChartBar } from
    '@fortawesome/free-solid-svg-icons';
For a more extensive choice of icons, I would recommend using the pro subscription of Font Awesome.
The above imported icons correspond to the following identifiers:
fas fa-chart-bar
fas fa-list
fas fa-search
In the tile definition, declare the icon property to use the IconDefnition type as shown:
import { IconDefinition } from "@fortawesome/fontawesome-common-types";

export class TileItem {
    text: string;
    link?: string;
    icon?: IconDefinition;
    description: string;

    constructor(text: string, link: string, icon: IconDefinition,
      description: string) {
        this.text = text;
        this.link = link;
        this.icon = icon;
        this.description = description;
    }
}
Once we have altered the tile item class, we can then use the icon definition type directly in an instance of the TileItem class when building our component menu tiles:
var bookListTile = new TileItem(
    "Book Lists Form",
    "/book/books",
    faList,
    "Book List shows all books in library catalog with detail links."
);

this.tiles.push(bookListTile);
In our component template, we can then render the icon within the fa-icon tag:
<div><fa-icon [icon]="tile.icon"></fa-icon>
    <span class="tile-menu-header">{{tile.text}}</span>
</div>
We set the icon to the icon object within the current TileItem object that is being iterated within our component’s HTML template.
Note: If you try to set the icon property to the icon class string such as “fas fa-list” then you will get a run-time error “not finding the icon”.
When the application is built and run, the output on our dashboard should show as follows:
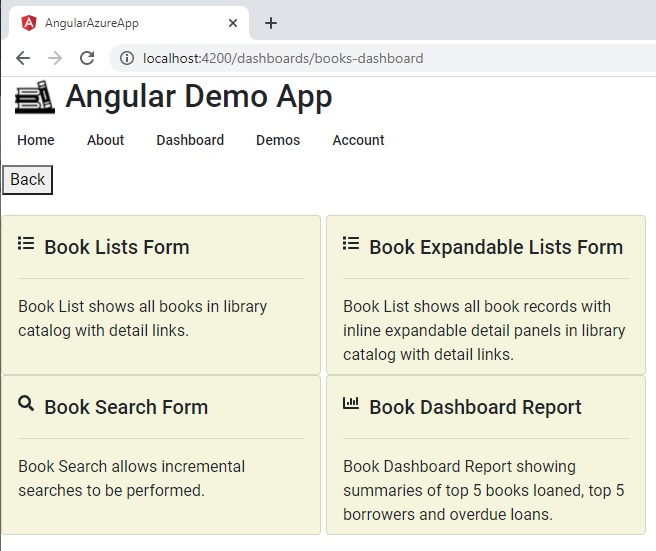
As we can see, the icons have given our tiled menus an improved look and feel. The same icons could also be used within the application’s menu items.
In a future post I will show how to apply the above instructions to embed icons within an angular application’s user interface elements.
That is all for today’s post.
I hope you found this post useful and informative.
Andrew Halil is a blogger, author and software developer with expertise of many areas in the information technology industry including full-stack web and native cloud based development, test driven development and Devops.