
Welcome to today’s post.
In today’s post I will explain what change detection is within an Angular component. I will then show how to use it to detect changes to properties within a component.
In the Angular development framework, there are events within components that we can attach through event handlers and perform useful tasks. These can include initialization of data, handling changes to component properties, and object cleanups. These events are known as lifecycle hooks. In this post, I will be covering one of these lifecycle hooks, change detection.
In the first section, I will explain what the change detection lifecycle hook is. I will then show how to setup change detection in a component. I will then go through an example of how to process change detection between child and parent components.
What is Change Detection?
Change detection is an Angular lifecycle hook that detects change events to component input properties. The detection of changes occurs to component properties that are declared with the @Input() component class decorator.
When any of the component input property values have an initial value, or change from a previous value, the lifecycle hook event handler will be triggered. The lifecycle hook for change detection is OnChanges.
For the lifecycle hook to fire, the input directive must be bound to input data. When the data that is bound to the input changes, then the handler of the lifecycle hook will be executed.
We then declare an ngOnChanges() call-back method to handle changes to the properties. When at least one of the data bound properties changes, the method will be invoked.
Detection of data-bound properties occurs when the default change detector has checked at least one of the data-bound properties has changed.
Setup of SimpleChange in a Component
Before the OnChanges handler can be used, it must first be imported as shown:
import { Component, EventEmitter, Input, OnChanges, OnInit, Output,
SimpleChanges } from '@angular/core';
The class must then be extended with the OnChanges interface:
export class DemoEmitterChildComponent implements OnInit, OnChanges {
    …
}
Next, the handler for the OnChanges call-back method must be declared (and later implemented) as shown:
ngOnChanges(changes: SimpleChanges)
{
    …
}
The input for the handler consists of an object of type SimpleChange.
The SimpleChange object shows the change from a previous value to a new value.
The class definition and members for SimpleChange are shown below:
class SimpleChange {
    constructor(previousValue: any, currentValue: any, firstChange: boolean)
    previousValue: any
    currentValue: any
    firstChange: boolean
    isFirstChange(): boolean
}
When a change to an input occurs, an instance of SimpleChanges is passed into the ngOnChanges() event handler hook.
Processing Changes Through ngOnChanges()
In this section, I will be showing how to use the ngOnChanges() event to process changes from SimpleChanges that are updated from the change detection lifecycle.
An example illustrating the above is shown below.
First, the input parameters are as shown:
@Input() incomingRating: number = 0;
@Input() incomingMessage: string = '';
:Our HTML that modifies the globalMessage input is shown below:
<div>
    <p>Type in a global message..</p>
    <label>Message: </label>
    <input type="text" id="global-message" [(ngModel)]="globalmessage">
</div>
The component handler that modifies the globalRating input from a child output is shown below:
changedChildData(dataItem: number) {
    this.globalRating = dataItem;
}
Next, our event hook for the changes and implementation to log the change for each input is shown:
ngOnChanges(changes: SimpleChanges)
{
    if (changes.incomingMessage)
        console.log("Current changed value for incomingMessage is: " +
 	changes.incomingMessage);
    if (changes.incomingRating)
        console.log("Current changed value for incomingRating is: " +
    changes.incomingRating);
}
Our component which includes the above inputs is shown below:
<demo-emitter-child
    [id]=1
    [incomingMessage]="globalmessage"
    [incomingRating]="globalRating"
    (childEvent)='changedChildData($event)'
    #cmp1>
</demo-emitter-child>
In the next section, I will show how we trace the console debugger outputs from the change detection events sent from a parent to a child component.
Debugging and Outputs from Component Change Detection
Whenever values for the inputs incomingMessage and incomingRating changes, the change detection will trigger, and the following outputs will show:
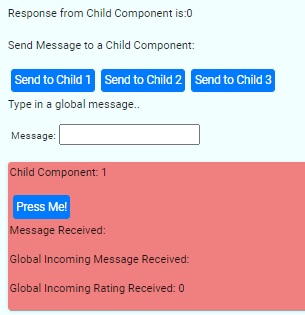
With the initial execution of the component, the output will be as shown:
Current changed value is undefined
The above corresponds to the following UI component state:
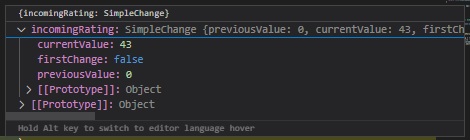
With subsequent changes to the input parameters, the output for the numeric input is shown:
Current value for incomingRating is: 50
Previous value for incomingRating is: 0
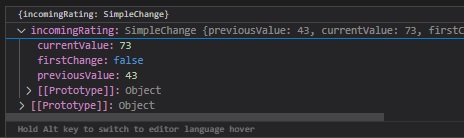
Current value for incomingRating is: 87
Previous value for incomingRating is: 50
Below is a screenshot of the change during debugging of the first numeric change of the SimpleChange object:
And below for the subsequent numeric change of the SimpleChange object:
Below is a screenshot of the UI change for the subsequent numeric change:
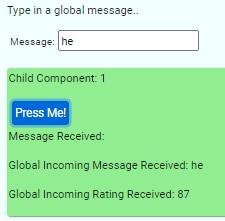
With subsequent changes to the input parameters, the output for the string input is shown:
Current value for incomingMessage is: h
Previous value for incomingMessage is:
Current value for incomingMessage is: he
Previous value for incomingMessage is: h
The above corresponds to the following UI component state when the string input changes:
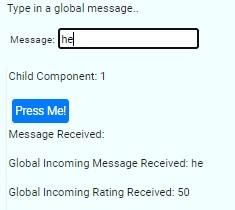
Note that for a string value that is incrementally changed with typed values, the change will occur one character at a time.
Below is a screenshot of the change of the first string change of the SimpleChange object:
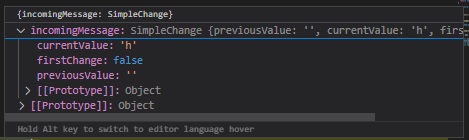
And below for the subsequent string change of the SimpleChange object:

The above discussion has showed us how to bind input properties into a component using the @Input() decorator and to also track changes to the inputs parameter’s values using the ngOnChanges lifecycle hook.
The most useful way in which tracked changes are utilized within a component is to refresh the component depending on changing values. Typical examples on how this would most be most usefully utilized as with dynamic charting components, dynamically changing lists (such as ranking lists), dashboards.
That is all for today’s post.
I hope you have found this post useful and informative.
Andrew Halil is a blogger, author and software developer with expertise of many areas in the information technology industry including full-stack web and native cloud based development, test driven development and Devops.

