Welcome to today’s post!
In today’s post I will be explaining how the different change detection strategies can be used within an Angular component.
I will then explain with an example how each strategy can be applied within a component to control rendering of the component view in relation to the properties that change within the component.
In a previous post, I showed how to use the simplest type of change detection within an Angular component, where I used the OnChanges lifecycle hook to detect changes from within a form’s input components. With that post, I did not show how to configure different types of change detection strategies that control WHEN the changes can be detected within the component. I will be going over these strategies in this post.
Change detection from a component can be used to notify other dependent components of changes. A practical example of this would be a child component within a chart or dashboard notifying other components within the same chart or dashboard of one of many changes. Another example is the notification of a data provider of changes from a component that can be updated within a data source.
I will explain two change detection strategies and explain how they are used within a component.
Using the Default (CheckAlways) Change Detection Strategy
With a default change detection strategy, the changes to a component are detected as they occur. This is known as the CheckAlways strategy, where changes occur until they are deactivated.
The changeDetection attribute within our component decorator is set to allow for the default change detection strategy as shown:
changeDetection: ChangeDetectionStrategy.Default
Our child component is then used to detect changes from the userName form control as they occur:
import {
  ChangeDetectionStrategy,
  ChangeDetectorRef,
  Component,
  EventEmitter,
  OnInit,
  Output,
} from '@angular/core';
import { FormControl } from '@angular/forms';
import { map } from 'rxjs/operators';

@Component({
  selector: 'app-data-entry',
  templateUrl: './data-entry.component.html',
  styleUrls: ['./data-entry.component.css'],
  changeDetection: ChangeDetectionStrategy.Default,
})
export class DataEntryComponent {
  username = new FormControl('');
  @Output() dataChanged: EventEmitter<string> = new EventEmitter<string>();

  constructor(private ref: ChangeDetectorRef) {
    console.log('data entry started!');

    this.username.valueChanges
      .pipe(
        map((val) => {
          console.log('username value changed is : ' + val);
          this.dataChanged.emit(val);
        })
      )
      .subscribe();
  }
}
The HTML for the child data entry component is:
<p>Simple data entry form</p>

<div class="custom-style">
  <label for="username">Enter your name: </label>
  <input id="username" type="text" [formControl]="username" />
</div>
<div>current child change: {{ changedValue }}</div>
Our parent component has a handler that received changes from the child component as shown:
import { Component, ViewChild } from '@angular/core';

@Component({
  selector: 'my-app',
  templateUrl: './app.component.html',
  styleUrls: ['./app.component.css'],
})
export class AppComponent {
  name = 'Angular';
  detectedChanges: string[] = [];

  childDataChanged(val: any) {
    console.log('child data change: ' + val);
    this.detectedChanges.push(val);
  }
}
And the parent HTML template displays the changes from the child data entry component as they are received from the child emitted output:
<p>App to Test Change Strategy!</p>

<app-data-entry (dataChanged)="childDataChanged($event)"> </app-data-entry>

<p>Changes from child component..</p>

<div *ngFor="let item of detectedChanges">
  <b>latest change received:</b> {{ item }}
</div>
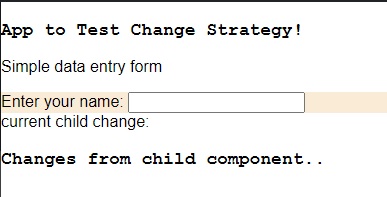
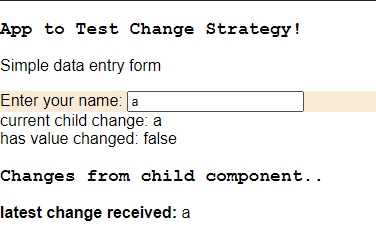
The initial state of the components is as shown before any inputs:
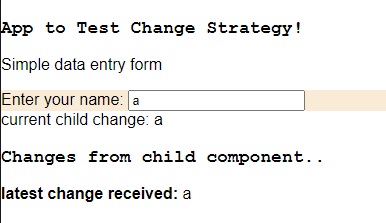
When we type text into the child component’s edit control, the changes are detected immediately and are output from the child component. The output in the parent component is immediate as shown:
Using the OnPush (CheckOnce) Change Detection Strategy
The other strategy is the CheckOnce strategy, which has automatic change detection deactivated. What this means is we can then control when changes are detected from within the component. We can then push these change notifications out to other components as required. For this reason, the changeDetection attribute within our component decorator is set to allow for the push change detection strategy as shown:
changeDetection: ChangeDetectionStrategy.OnPush
In our child data entry component, along with a variable that stores the changes from the text input, we also include an additional Boolean variable flag to keep track if the value has recently changed.
 valueChanged: boolean = false;
 changedValue: string = '';
We can also, periodically, every 5 seconds check if the value has changed, flag it as unchanged, then mark the view as changed. This allows the child view to render when we want it to. This excerpt is shown below:
setInterval(() => {
  if (this.valueChanged) {
    console.log('value changed is : ' + this.changedValue);
    this.valueChanged = false;
    this.ref.markForCheck();
  }
}, 5000);
The component source is shown below:
import {
  ChangeDetectionStrategy,
  ChangeDetectorRef,
  Component,
  EventEmitter,
  OnInit,
  Output,
} from '@angular/core';
import { FormControl } from '@angular/forms';
import { map } from 'rxjs/operators';

@Component({
  selector: 'app-data-entry',
  templateUrl: './data-entry.component.html',
  styleUrls: ['./data-entry.component.css'],
  changeDetection: ChangeDetectionStrategy.OnPush,
})
export class DataEntryComponent {
  username = new FormControl('');
  @Output() dataChanged: EventEmitter<string> = new EventEmitter<string>();
  valueChanged: boolean = false;
  changedValue: string = '';

  constructor(private ref: ChangeDetectorRef) {
    console.log('data entry started!');
    setInterval(() => {
      if (this.valueChanged) {
        console.log('value changed is : ' + this.changedValue);
        this.valueChanged = false;
        this.ref.markForCheck();
      }
    }, 5000);

    this.username.valueChanges
      .pipe(
        map((val) => {
          console.log('username value changed is : ' + val);
          this.valueChanged = true;
          this.changedValue = val;
          this.dataChanged.emit(this.changedValue);
          this.ref.markForCheck();
        })
      )
      .subscribe();
  }
}
The HTML template for the child component is as shown with the additional display flag variable output as shown:
<p>Simple data entry form</p>

<div class="custom-style">
  <label for="username">Enter your name: </label>
  <input id="username" type="text" [formControl]="username" />
</div>
<div>current child change: {{ changedValue }}</div>
<div>has value changed: {{ valueChanged }}</div>
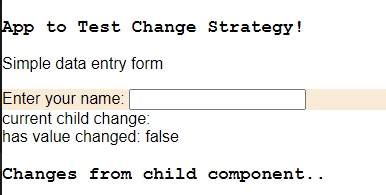
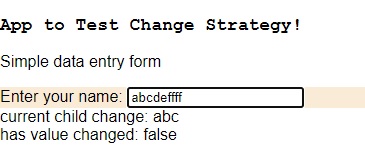
When we run the child component for the above child component with the OnPush strategy, the initial state is reflected below:
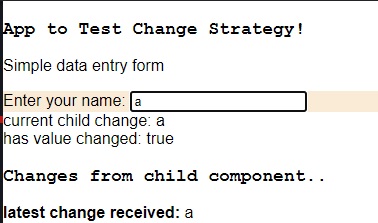
When the first change occurs, we see the output as shown with the changed flag set to True and the view refreshed with the property change:
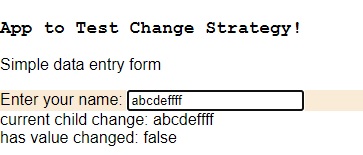
Five seconds later, we see the output as shown with the changed flag set to False and the view refreshed with the property change:
With the OnPush strategy, we mark the changes to component properties as checked so they are no longer dirty with the markForCheck() method of the ChangeDetectorRef as shown:
this.ref.markForCheck();
This allows the component template display to be re-rendered.
We have seen above the difference between the two component change detection strategies. In both cases, component property detection is enabled.
With the CheckOnce (OnPush) strategy we have more control to determine how often we want the component to render its HTML with the markForCheck() method.
With the CheckAlways (Default) strategy we have less control, as the changes are immediately rendered to the component HTML.
Attaching and Detaching from the Change Detection Tree
In situations where data changes continually, such as with live data, we can also detach from the change detection tree by using the command:
this.ref.detach();
This stops changes of properties and data from being rendered within the component view.
When we wish to re-attach to the change detection tree, we use the command:
this.ref.reattach();
With continuously changing live data, the re-attachment of change detection tree to the view allows data to be selectively rendered for performance reasons. This is shown in the constructor for the child component below:
constructor(private ref: ChangeDetectorRef) {
  console.log('data entry started!');
  setInterval(() => {
    if (this.valueChanged) {
      console.log('value changed is : ' + this.changedValue);
      this.valueChanged = false;
      this.ref.markForCheck();
    }
    this.ref.reattach();
  }, 5000);

  this.username.valueChanges
    .pipe(
      map((val) => {
        console.log('username value changed is : ' + val);
        this.valueChanged = true;
        this.changedValue = val;
        this.dataChanged.emit(this.changedValue);
        this.ref.markForCheck();
        this.ref.detach();
      })
    )
    .subscribe();
 }
When data is entered rapidly within the child component, the state changes as follows and just after we have tabbed off the input, the rendered view is as shown:
At this point, the detection tree is detached from the component view.
Once the five second period is re-triggered, the detection tree re-attaches to the component view and the view re-renders as shown to match the entered characters:
In what situations can we apply each strategy?
With very frequently changing data and properties (like live data) within a component, the recommended strategy is to use the OnPush strategy so that we do not continually re-render the component with changing properties and data.
With infrequently changing data, such as a data entry form, the recommended strategy is to use the Default strategy so that can the component is rendered as changes occur.
We have seen how to apply change detection strategies within an Angular component. More details on the change detection strategy can be found on the Angular site.
That is all for today’s post.
I hope you have found this post useful and informative.
Andrew Halil is a blogger, author and software developer with expertise of many areas in the information technology industry including full-stack web and native cloud based development, test driven development and Devops.