
Welcome to today’s post.
In today’s post I will be showing how to integrate an ARM Template into an Azure DevOps release pipeline to allow us to deploy resources into Azure.
In a previous post I showed how to deploy an ARM Template into Azure using PowerShell. I also explained the structure and constituent sections of an ARM Template, including the resources that are deployed within an Azure Web Application. I also showed using PowerShell how to validate an ARM Template for errors before we can execute the template.
In a previous post I showed how to deploy an Azure Web App from a Release pipeline using a pipeline task Azure App Service Deployment template. In that deployment we required the Azure Web App and App Service Plan resources to exist within Azure for the template to run successfully.
The main difference with the deployment pipeline I will be showing here is that running an ARM template within an ARM Template Deployment task before the Azure App Service Deployment task will create the Azure app service plan and Azure web application resources before the web application artifacts can be published to the empty Azure web application within the Azure App Service Deployment task. This allows us to deploy the web application into Azure within having to re-create the web application or app service plan within Azure.
The entire process continuous integration and continuous deployment process that I will be explaining can be summarized in the following diagram:
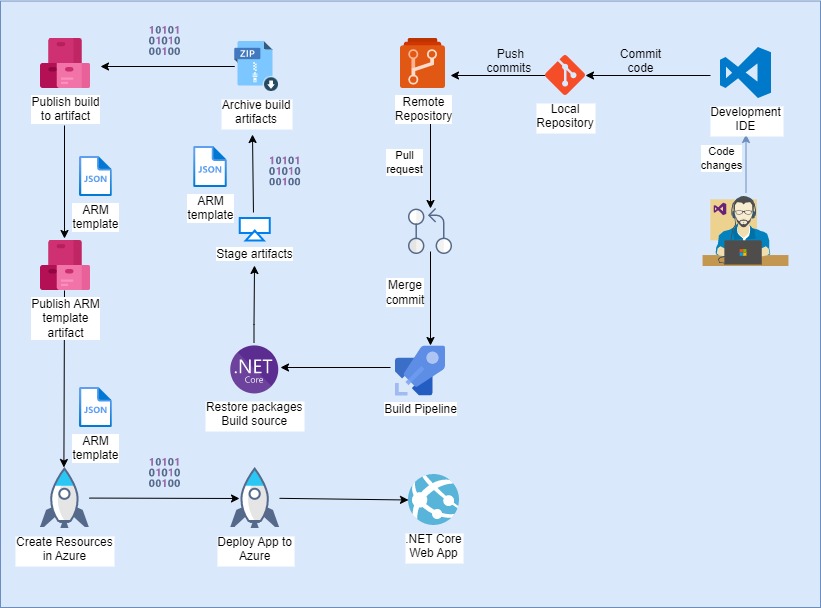
The key part of the process is inclusion of the ARM template into the build pipeline, then including it as an input into the deployment tasks within the release pipeline.
Before we can process an ARM template within our pipeline, we will need to include an ARM template file within the source code that we have versioned within the Azure DevOps Git repository.
For reference, the ARM template file JSON content I use is shown below:
{
    "$schema": "https://schema.management.azure.com/schemas/2019-04-01/deploymentTemplate.json#",
    "contentVersion": "1.0.0.0",
    "parameters": {
        "pSKU_Name": {
            "type": "string",
            "defaultValue": "F1",
            "allowedValues": [
                "F1",
                "D1",
                "B1",
                "B2",
                "B3",
                "S1",
                "S2",
                "S3",
                "P1",
                "P2",
                "P3",
                "P4"
            ],
            "metadata": {
                "description": "The plan's pricing tier and instance size."
            }
        },
        "pSKU_Capacity": {
            "type": "int",
            "defaultValue": 1,
            "maxValue": 3,
            "minValue": 1,
            "metadata": {
                "description": "The plan's instance count."
            }
        },
        "pLocation": {
            "type": "string",
            "defaultValue": "[resourceGroup().location]",
            "metadata": {
                "description": "The location for all resources."
            }
        },
        "pWebAppName": {
            "type": "string",
            "defaultValue": "[format('website{0}', uniqueString(resourceGroup().id))]",
            "metadata": {
                "description": "The web app name."
            }
        }
    },
    "variables": {
        "vHosting_Plan_Name": "[format('hostingplan{0}', uniqueString(resourceGroup().id))]",
        "vStorage_Account_Name": "[format('storageacc{0}', uniqueString(resourceGroup().id))]"
    },
    "resources": [
        {
            "type": "Microsoft.Storage/storageAccounts",
            "apiVersion": "2022-05-01",
            "name": "[variables('vStorage_Account_Name')]",
            "location": "[parameters('pLocation')]",
            "sku": {
                "name": "Standard_LRS"
            },
            "kind": "StorageV2",
            "properties": {
                "supportsHttpsTrafficOnly": true
            }
        },
        {
            "type": "Microsoft.Web/serverfarms",
            "apiVersion": "2022-03-01",
            "name": "[variables('vHosting_Plan_Name')]",
            "location": "[parameters('pLocation')]",
            "tags": {
                "displayName": "HostingPlan"
            },
            "sku": {
                "name": "[parameters('pSKU_Name')]",
                "capacity": "[parameters('pSKU_Capacity')]"
            }
        },
        {
            "type": "Microsoft.Web/sites",
            "apiVersion": "2022-03-01",
            "name": "[parameters('pWebAppName')]",
            "location": "[parameters('pLocation')]",
            "tags": {
                "[format('hidden-related:{0}', resourceId('Microsoft.Web/serverfarms', variables('vHosting_Plan_Name')))]": "empty",
                "displayName": "Website"
            },
            "properties": {
                "serverFarmId": "[resourceId('Microsoft.Web/serverfarms', variables('vHosting_Plan_Name'))]"
            },
            "dependsOn": [
                "[resourceId('Microsoft.Web/serverfarms', variables('vHosting_Plan_Name'))]"
            ]
        },
        {
            "type": "Microsoft.Web/sites/config",
            "apiVersion": "2022-03-01",
            "name": "[concat(parameters('pWebAppName'), '/web')]",
            "dependsOn": [
                "[resourceId('Microsoft.Web/sites', parameters('pWebAppName'))]"
            ],
            "properties": {
                "numberOfWorkers": 1
            }
        },
        {
            "type": "Microsoft.Insights/components",
            "apiVersion": "2020-02-02",
            "name": "[format('AppInsights{0}', parameters('pWebAppName'))]",
            "location": "australiaeast",
            "tags": {
                "[format('hidden-link:{0}', resourceId('Microsoft.Web/sites', parameters('pWebAppName')))]": "Resource",
                "displayName": "AppInsightsComponent"
            },
            "kind": "web",
            "properties": {
                "Application_Type": "web"
            },
            "dependsOn": [
                "[resourceId('Microsoft.Web/sites', parameters('pWebAppName'))]"
            ]
        }
    ]
}
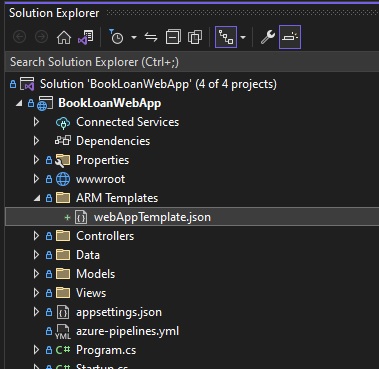
In our .NET Core application within Visual Studio, I have included the ARM template file within a sub-folder ARM Templates in the source root directory as shown:
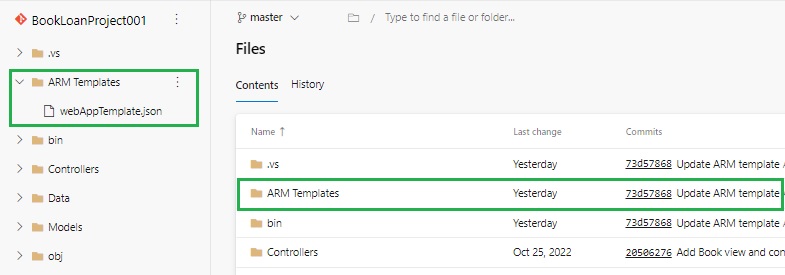
To move the ARM template into the Git repository in our Azure DevOps project, I commit and push the file into the repository using Git.
The ARM template file in our Git repository as shown.
In the next section, I will show how to configure the build pipeline.
Configuring the Build Pipeline
In the Continuous integration build pipeline, we will create tasks to do the following:
- Copy the ARM template from the source sub-folder into an artifact staging folder.
- Publish the artifact from the staging folder into an Azure artifacts folder arm.
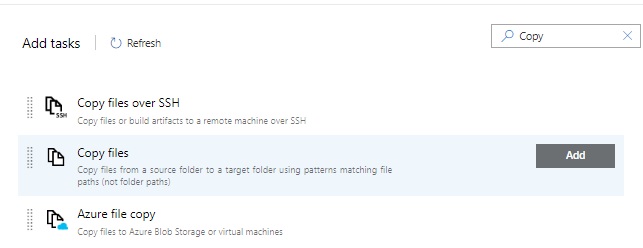
If the pipeline has already triggered, stop the pipeline, then edit the build pipeline to add the above two tasks. For the copy files task, we select the Copy files task template as shown:
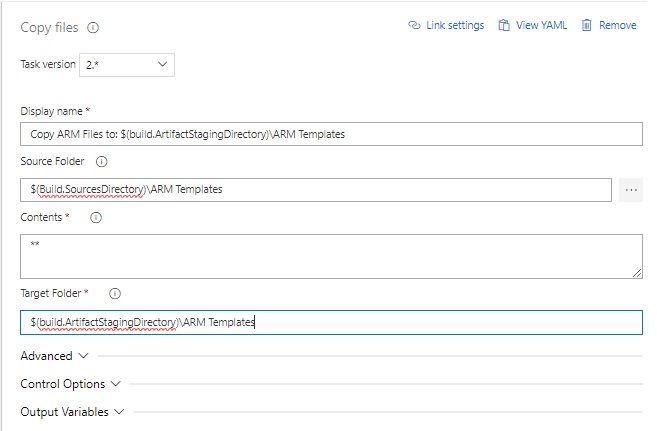
In the Copy file template, I enter the fields as shown, with the source folder as:
$(Build.SourcesDirectory)\ARM Templates
and target folder as:
$(build.ArtifactStagingDirectory)\ARM Templates.
The YAML for the copy files task is as shown:
steps:
- task: CopyFiles@2
  displayName: 'Copy ARM Files to: $(build.ArtifactStagingDirectory)\ARM Templates'
  inputs:
    SourceFolder: '$(Build.SourcesDirectory)\ARM Templates'
    TargetFolder: '$(build.ArtifactStagingDirectory)\ARM Templates'
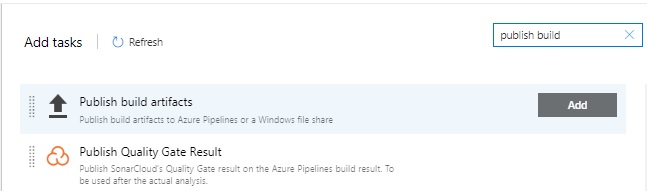
To implement the next task, which is to publish the ARM template from the artifact staging folder into the artifacts store, we select and add a Publish build artifacts task from the template list as shown:
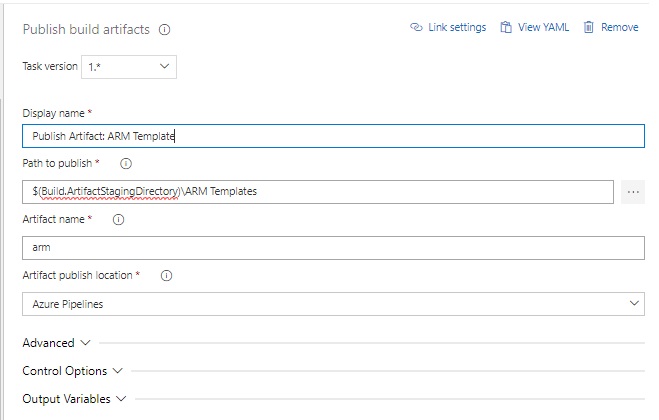
In the Publish build artifacts task definition, I enter the details as shown with the path to publish as $(build.ArtifactStagingDirectory)\ARM Templates, artifactname arm, and Artifact publish location as Azure pipelines:
The YAML for the publish artifact task is as shown:
steps:
- task: PublishBuildArtifacts@1
  displayName: 'Publish Artifact: ARM Template'
  inputs:
    PathtoPublish: '$(Build.ArtifactStagingDirectory)\ARM Templates'
    ArtifactName: arm
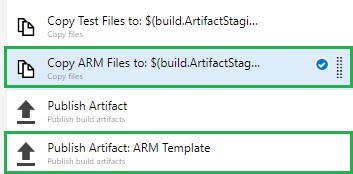
The two extra pipeline tasks we have just created will be ordered as shown:
We then run the build pipeline the above two tasks should run successfully (provided we have set the folders correctly for the ARM templates).
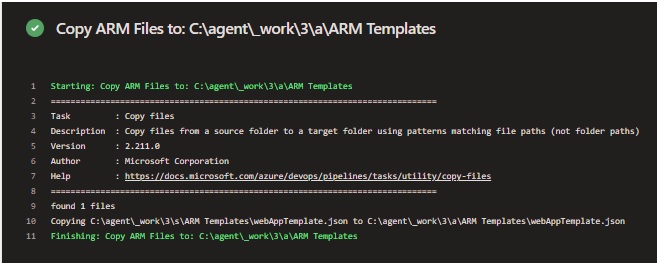
The pipeline task logs for the copy ARM file will look as shown:
The pipeline task log for the publish artifact for the ARM file will look as shown:

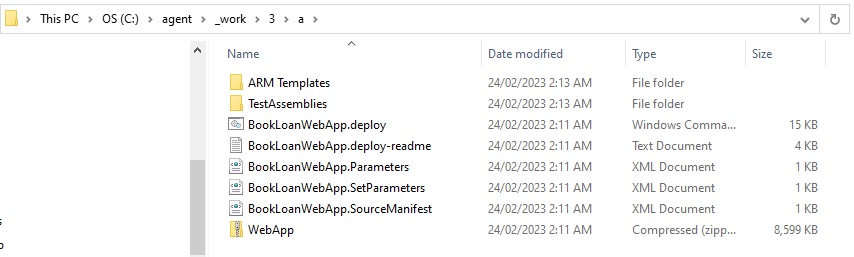
Once the two new tasks have completed, the artifacts will show the published ARM template folder as shown in the staging folders on the build Agent:
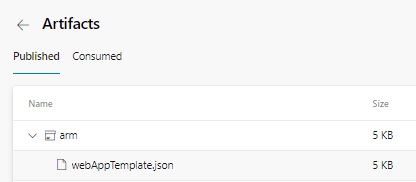
And in the arm folder in Azure DevOps Artifacts storage:
We are now ready to configure the release pipeline to consume the ARM template from the artifacts folder and use it to run in one of the deployment tasks to create the Azure resources needed for our web application.
In the next section, I will show how to configure the release pipeline.
Configuring the Release Pipeline
In an Azure DevOps project, under Pipelines, select Releases. Whenwe are in the release pane, select Edit in the top-right corner of the pane. If no existing release pipeline, then create a new pipeline and configure the artifact as we did in the previous post. In the release pipeline editor, add a new stage. Select the Empty job task as shown:

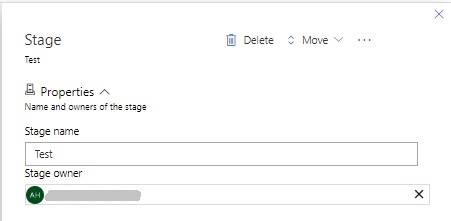
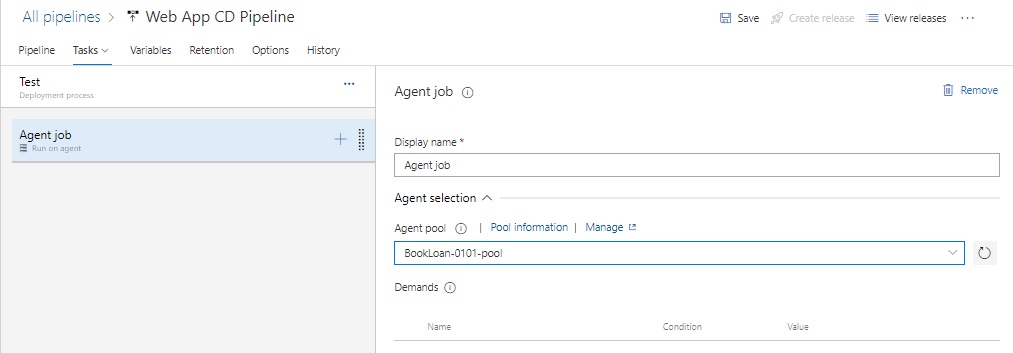
In the Stage job enter a name. I have used the name Test as shown:
In the stage, select the job link. In the job definition select the Agent job definition. Select an existing pool under the Agent pool drop down list. In the pipeline I have selected an agent pool from an existing self-hosted agent pool. You may alternatively select a Microsoft hosted agent pool.
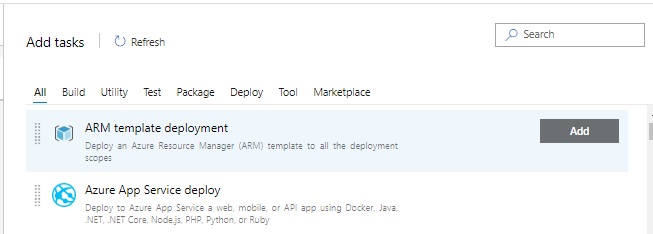
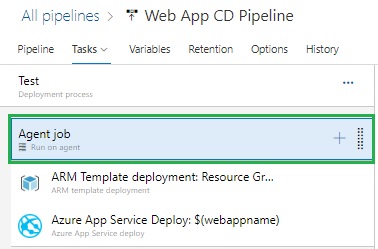
Next, we will select a template to help us run the ARM template. To do this we add another task and from the list of templates select the ARM template deployment task template as shown:
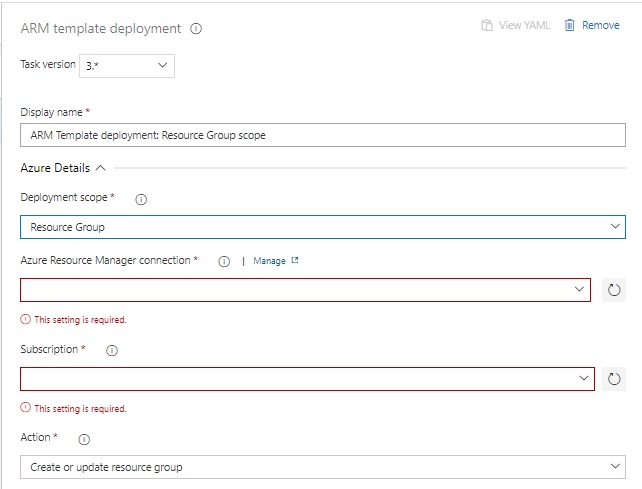
In the ARM template deployment parameters, enter the Deployment scope as Resource Group, ARM connection and subscription (fill in accordingly).
Scroll down to the section beginning with the Template field as shown:
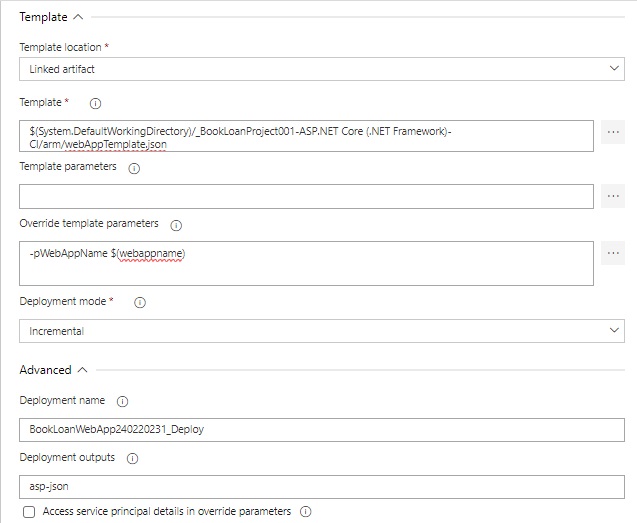
To be able to use the artifact, in the Template location field, select Linked artifact.
In the Template field, we select the ARM template artifact file. On clicking the ellipsis … we are shown the Linked artifacts folder as shown, then select the ARM template file under the arm subfolder as shown:
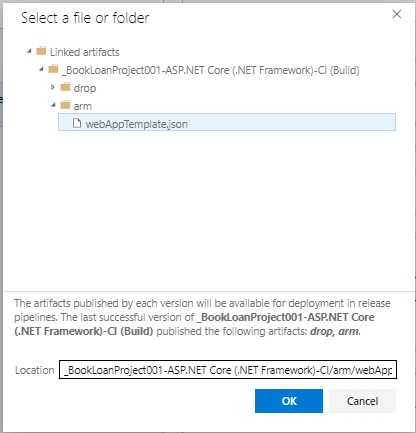
The linked file URL is then:
_BookLoanProject001-ASP.NET Core (.NET Framework)-CI/arm/webAppTemplate.json
In the Override template parameters field, we enter the parameter override:
-pWebAppName $(webappname)
Recall from the JSON template content I showed earlier, the pWebAppName template parameter holds the name of the Azure web application resource that we will create. After creation, it will be empty with no source. Following from this, the web deployment task in the same stage will deploy our artifacts from the web application build.
The corresponding YAML script looks like the following (some sections already specified from template will vary in your own pipeline):
steps:
- task: AzureResourceManagerTemplateDeployment@3
  displayName: 'ARM Template deployment: Resource Group scope'
  inputs:
    azureResourceManagerConnection: '[you specify]'
    subscriptionId: '[you specify]'
    resourceGroupName: 'BookLoan240220231_RG'
    location: 'Australia East'
    csmFile: '$(System.DefaultWorkingDirectory)/_BookLoanProject001-ASP.NET Core (.NET Framework)-CI/arm/webAppTemplate.json'
    overrideParameters: '-pWebAppName $(webappname)'
    deploymentName: 'BookLoanWebApp240220231_Deploy'
    deploymentOutputs: 'asp-json'
Next, I will select the artifacts to download into our Test job.
Select the Agent job in the stage definition.
Scroll to the Artifact Download section. Expand it. You will see a check box Select all artifacts, then under that will show the drop and arm artifacts folders. Recall that the drop folder contains the zipped binaries of our web application. The arm folder contains the ARM template JSON file that we published from our source folder during the build pipeline.
Select all artifacts for download by checking the Select all artifacts.
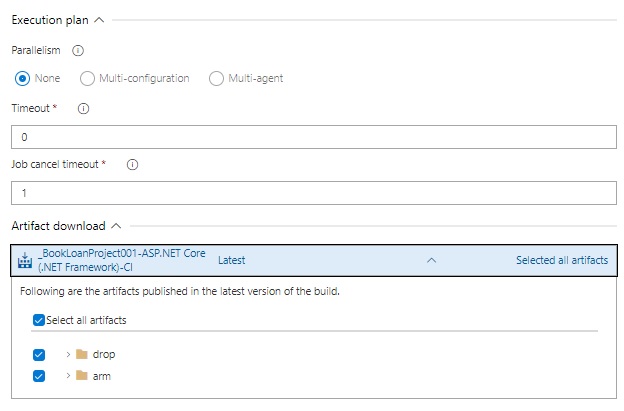
Save the task.
Create a release.
Manually deploy the Test stage.
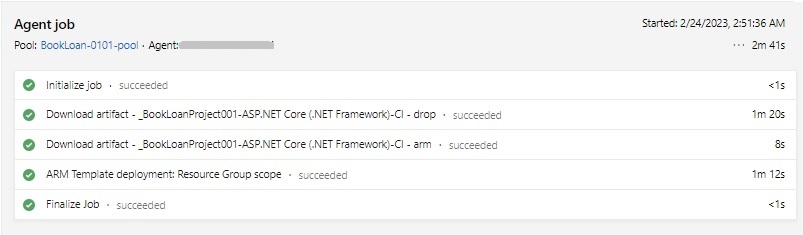
After several minutes, with no errors, the tasks will have run under the release Agent and completed as shown:
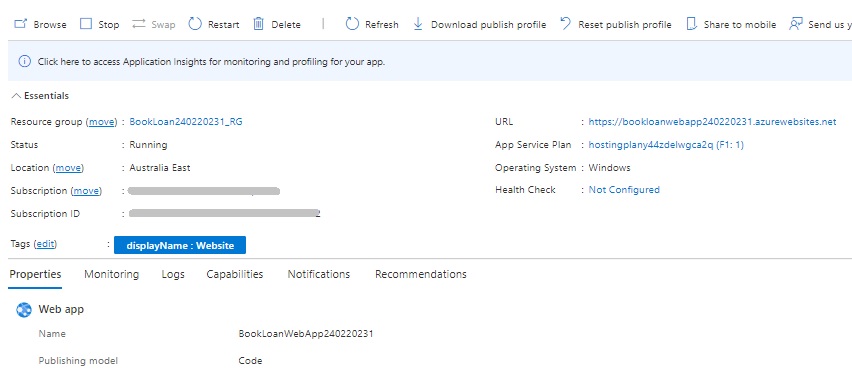
Open the Azure Portal. Then open the resource group we ran the template deployment, then select the App Service Plan we have created. Under the properties we can see the Web app created. If we attempt to click on the URL we will not see any content as the web app is empty with no source content deployed to it.
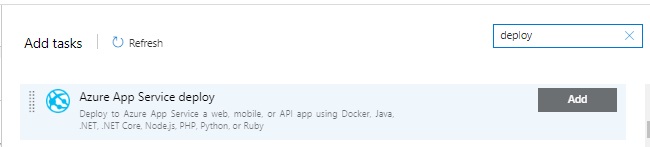
I will show how we deploy the application artifacts into the empty web application to make it browsable. In the job, add a new task.
From the task templates list select and add the Azure App Service deploy task as shown:
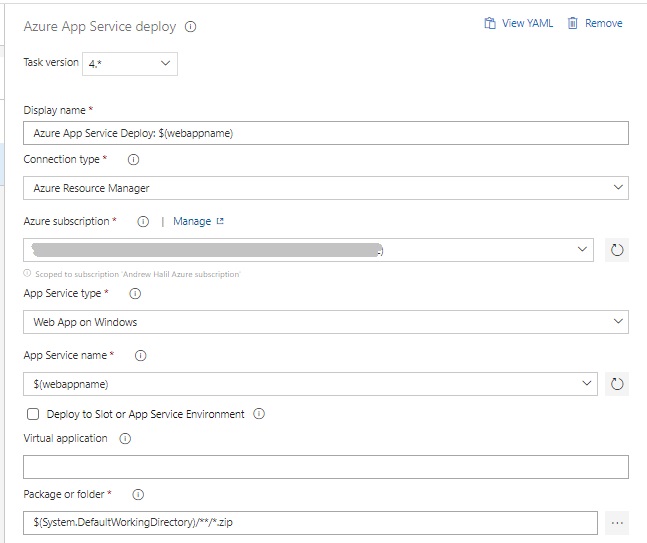
In the parameters, in the Connection type field select Azure Resource Manager. Select an existing Azure subscription. In the App Service type field select Web app on Windows.
In the App Service name, enter:
$(webappname)
I have parameterized the web app name as it was also used within the template deployment task.
Keep the Package or folder field default value.
Save the job.
Create a new release.
Manually deploy the Test stage.
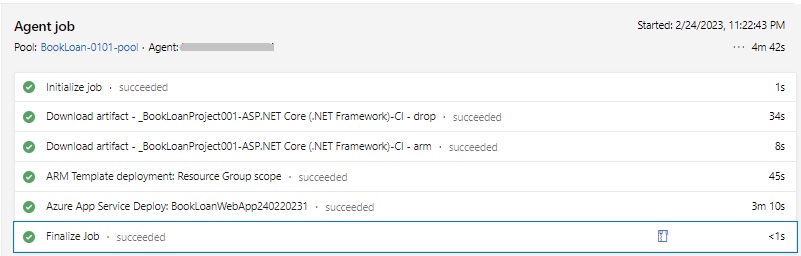
After several minutes of successful action, the release Agent will have completed the following tasks in our Test stage job:
Next, we browse to the deployed Azure web application at:
https://[web-app-name].azurewebsites.net
And the following page will appear:

We have just deployed our web application using an ARM template within a release pipeline using Azure DevOps.
To save possible charges, from the Azure Portal delete the resources under the resource group.
By using the ARM template, we saved ourselves from having to create some of the resources manually in the Azure portal and have those built automatically during the release pipeline.
That is all for today’s post.
I hope you have found this post useful and informative.
Andrew Halil is a blogger, author and software developer with expertise of many areas in the information technology industry including full-stack web and native cloud based development, test driven development and Devops.

