Welcome to today’s post.
In today’s post I will show how to access secrets from the Azure Key Vault. I will also explain what secrets are, why use them, and how they are created from the Azure Key Vault.
Before I delve into explaining the Azure Key Vault and how to make use of it, I will cover the other approaches we use to store application settings within both on-premises environments and the Azure cloud-based environments.
The need to secure a particular settings value depends on what the risk is of revealing the value to an unintended reader or recipient. Unauthorized usage of a particular resource can incur significant costs to the owner of the resource. This is why resources that are created within one of the premium tiers must be secured to prevent possible access breaches.
Explaining the storage of different types of application settings
When we don’t wish to secure any parameters within our application, we can use the familiar approach of storing key and value pairs within an application settings configuration file, which is what I showed in a previous post. With the app settings file, we store the settings in the same local on-premises server environment the application is hosted, so the settings are visible to whoever is maintaining the application. In this scenario, only those who have access to the server environment can access and read the settings.
Another approach I showed in a previous post was to store the application settings within the Azure environment. In the Azure, cloud-based environment, Azure accounts that have access to the Azure App Service applications can read the settings for the application. Again, those who have access to the Azure App Service resource can view the values within the settings.
When an application that is implemented in a developer workstation environment, or application artifacts are within a continuous build and release environment, the deployed application is published into an existing Azure App Service web application in Azure with the settings key and value pairs stored within the Azure App Service web application within the Azure environment. Initially, these values are set with defaults from the deployed application settings and will require the settings values to be overridden with values specific to Azure resources, such as database connection strings, endpoints to storage containers, services, and so on.
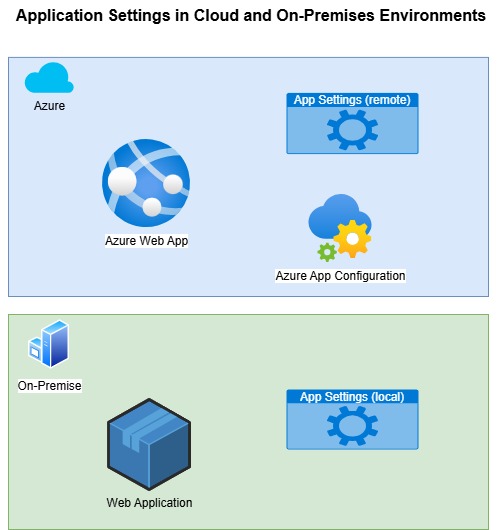
Another alternative way to store application configurations and settings is to use the Azure App Configuration service, which I showed in a previous post. The Azure App Configuration Service allows applications that are hosted in Azure or on-premises to vary the configurations based on labels and the current environment. This approach is ideal in an environment that supports the use of DevOps continuous builds and releases, with the main variant being the environment (development, test, staging, UAT, production). The values obtained from the app configuration service are determined by filtering by the current environment. In this method of configuration storage, connection strings and endpoints are accessible for each environment without being stored with the application itself. Only the environment and configuration service name are used to read the remote settings. A diagram depicting the above possibilities is shown below:

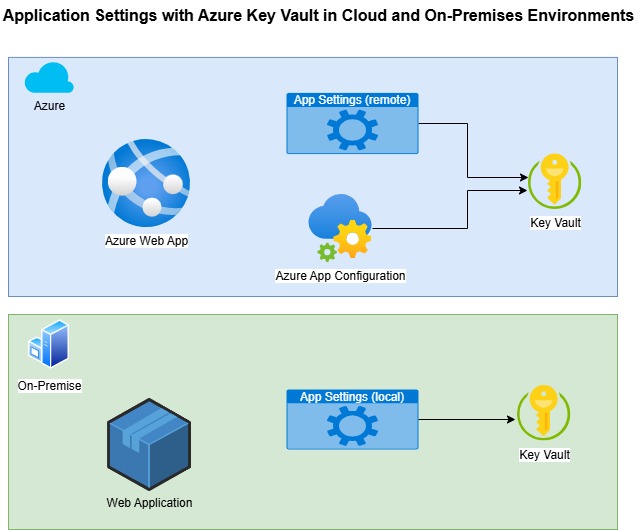
A more secure implementation of application settings using Azure Key Vault references is shown below:

In the next section, I will explain what application secrets are, what types of parameters they are used with, and what applications and systems they would be used in.
What are Application Secrets?
Secrets are a type of configuration parameter that is secure. Configuration parameters are used in many different types of applications, server-side components, and in scripts that are part of a DevOps pipeline, such as ARM or Bicep templates.
When we do not want sensitive parameters to be known to the developer, tester, or even the DevOps engineer that is maintaining the code or scripts of the resource, the most secure way of protecting the value of the parameter is to use a key vault. With a key vault, access to the secret value is through a secret name, which is specified along with the key vault name.
In addition, access to the secrets within the key vault are accessible only through Azure accounts that have permissions to read information from the vault.
When configuring a resource that requires sensitive values such as:
Passwords
Logins
API keys
Connection strings
Endpoints
Encryption keys
We can store the above types of parameters in a secure Azure Key Vault so that we do not have to store them on a client machine or in server configuration files.
The dangers of keeping sensitive configuration values visible in a local client machine or server configuration file are the risks of the details being leaked to an external party.
We resolve this problem by storing a reference to remote secure storage vault secrets.
The types of systems that we can reference secrets from an Azure Key Vault include:
Client applications
Server components
Deployment pipelines
In each of these situations, a user or process that is running, with read access from the Key Vault, can read the secure parameter value, and make use of it for configuration purposes.
The key pre-requisites for access to a secret within a Key Vault are:
- A Key Vault endpoint.
- Read access permissions.
- The secret name
How to Create a Key Vault
I will first show two ways of creating a Key Vault.
The first is using the Azure Portal.
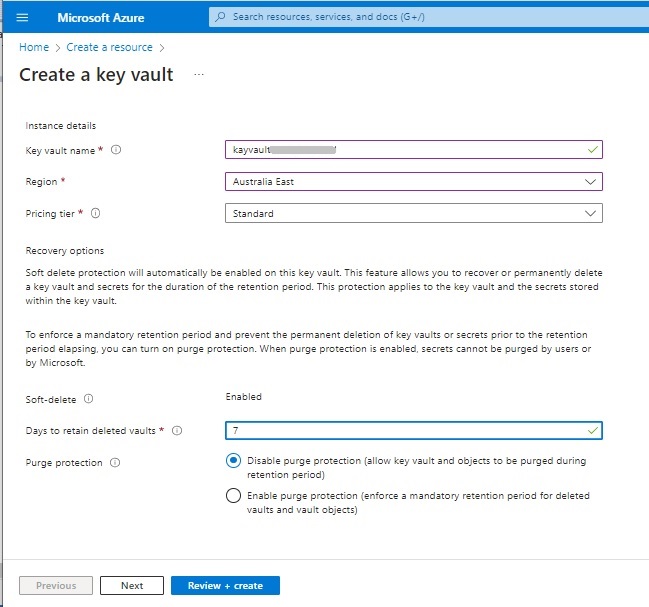
In the Market Place search for “vault”. You will see the resource “Key Vault”.

After clicking “Creating” the following dialog shows:

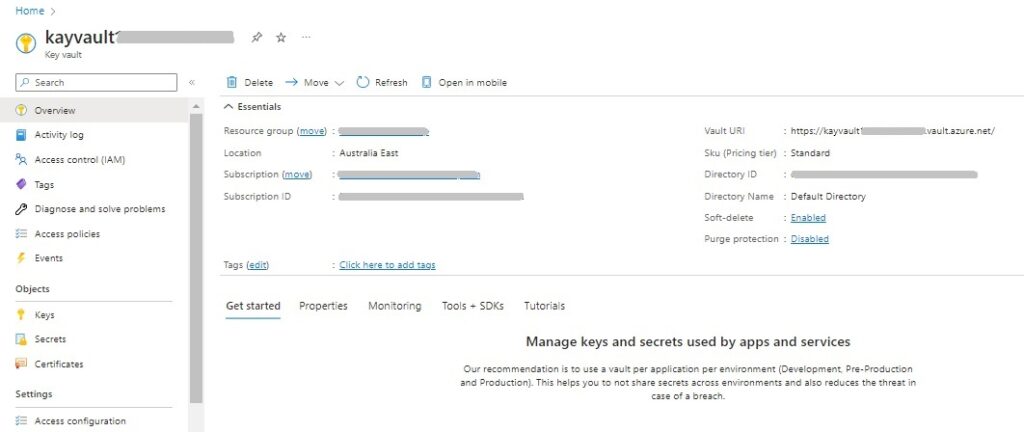
Entering the parameters will result in the creation of a key vault resource as shown:

I will now show how to create a Key Vault using the Azure CLI.
Creating an Azure Key Vault Secrets with Azure CLI
Run the following scrips in the command prompt. I will assume you have installed Azure CLI in your machine.
Provide entries for [your resource group], [your location], and [your key vault name].
az login
az group create –name [your resource group] –location [your location]
az keyvault create –name [your key vault name] –location [your location] –resource-group [your resource group]
After the key vault is created and provisioned, the key vault URI will resemble:
https://[your key vault name].vault.azure.net/
Next, we will create the Key Vault secret name and secret value with the following command:
az keyvault secret set
–vault-name [your key vault name]
–name “[your secret name]”
–value “[your secret value]” –output none
After your secret is created, the name will display in the Portal in the Secrets menu option:

After selecting the secret, you will be taken to the Secrets Versions:

Clicking on the version will take you to the definition of the Secret Version:

The secrets version allows (if you are the creator or vault administrator to view the secret value.
I will now show how to connect to the Azure Key Vault, create and access secrets from within a .NET Core application.
Accessing Azure Key Vault Secrets from .NET Core
Open Visual Studio Code
Open an existing folder.
Create a subfolder with a meaningful name, e.g. KeyVaultSecretsApp.
Change to the subfolder.
Run the following dot net command in your sub-folder (assuming you have .NET 7.0):
dotnet new console –framework net7.0
The above creates a blank .NET Core console app, with a Program.cs file and a KeyVaultSecretsApp.csproj project file in the project root folder.
I will create some basic code that will connect to the Key Vault, then create another secret.
In Program.cs, enter the following code:
using System;
using System.Threading.Tasks;
using Azure.Identity;
using Azure.Security.KeyVault.Secrets;

namespace KeyValueSecretsApp
{
    class Program
    {
        static async Task Main(string[] args)
        {
            const string sSecret_Name = "[A secret name]";
            var sKeyVault_Name = "[A key vault name]";
            var sKV_Uri = $"https://{sKeyVault_Name}.vault.azure.net";

            var client = new SecretClient(new Uri(kvUri), new DefaultAzureCredential());

            var sSecret_Value = "[A secret value]";

            Console.Write($"Creating secret in {sKeyVault_Name} names '{sSecret_Name}' with value '{sSecret_Value}' ...");
            await client.SetSecretAsync(sSecret_Name, sSecret_Value);
            Console.WriteLine(" finished.");

            Console.WriteLine($"Getting secret value from {sKeyVault_Name}.");
            var vault_secret = await client.GetSecretAsync(sSecret_Name);
            Console.WriteLine($"The secret is '{vault_secret.Value.Value}'.");
        }
    }
}
In the placeholders [A key vault name], [A secret name], and [A secret value] above, enter your desired values. Ensure the value in [A key vault name] matches what you used when using the Azure CLI (or if using the Azure Portal).
To run the above application code, do the following.
Under the Run menu, select Add Configuration… as shown:

Next, select the .NET 5+ and .NET Core option (or whatever the current version you are using) as shown:

Start running the application (F5 with debugging or Ctrl+F5 without debugging).
If the application does not run, then you will need to run additional Azure.* packages to the project.
Try adding the following packages using the command terminal:
dotnet add package Azure.Identity
dotnet add package Azure.Security
dotnet add package Azure.Security.KeyVault.Secrets
After the above packages are added successfully, the project (.csproj) file will resemble:
<Project Sdk="Microsoft.NET.Sdk">

  <PropertyGroup>
    <OutputType>Exe</OutputType>
    <TargetFramework>net7.0</TargetFramework>
    <ImplicitUsings>enable</ImplicitUsings>
    <Nullable>enable</Nullable>
  </PropertyGroup>

  <ItemGroup>
    <PackageReference Include="Azure.Identity" Version="1.9.0" />
    <PackageReference Include="Azure.Security" Version="1.1.0" />
    <PackageReference Include="Azure.Security.KeyVault.Secrets" Version="4.5.0" />
  </ItemGroup>

</Project>
Next, run the application using the command:
dotnet run
If you have selected an existing secret name in your parameters, the output similar to that below will show:
Creating secret in kv1234567890 names 'kvsSecretName' with value 'another big secret' ... finished.
Getting secret value from kv1234567890.
The secret is 'another big secret'.
In the Azure Key Vault secrets, you will see an additional version created as shown:

If you re-run the application with a different secret name to those already created, the output similar to that below will show:
Creating secret in kv1234567890 names 'kvsAnotherSecretName' with value 'another big 1234567890secret' ... finished.
Getting secret value from kv1234567890.
The secret is 'some other big secret'.
In the Azure Key Vault secrets, you will see an additional secret created as shown:

After completion of the above you can delete the key vault resource by deleting the containing resource group. If you selected the soft deletion option when creating the key vault resource with a retention period, then the key vault keys and secrets will still be recoverable during the retention period.
We have seen how to create an Azure Key Vault resource and secrets, and then create and read key vault secrets from a .NET Core application.
That is all for today’s post.
I hope you have found this post useful and informative.
Andrew Halil is a blogger, author and software developer with expertise of many areas in the information technology industry including full-stack web and native cloud based development, test driven development and Devops.


