

Welcome to today’s post.
In today’s post, I will be showing you how to train a custom document intelligence machine learning model to extract information from documents using Azure AI Document Intelligence. I will also be showing you how to create a custom data extraction document form machine learning model and use that to test extractions of document form elements.
In a previous post, I showed how to extract information from documents and generate searchable indexes from them. What this showed us is that we could take unstructured data and extract information, such as images, text, phrases, and entities and make them searchable.
Similarly, we can take document forms and extract information from them in the form of input fields and values, and supply the data into another system, such as an accounting system, or an online application system. In the previous post, I showed how to use one of the prebuilt machine learning models from the Azure AI Document Intelligence Studio to analyze an input invoice PDF document form and extract document form data from it.
Comparing Structured Document Forms vs Unstructured Document Forms
The types of document forms inputs that we use are as follows:
- Structured forms that are provided in the form of user interfaces that contain data entry fields and text edits for input values.
- Unstructured forms that are provided in the form of PDFs or scanned images.
With 1, we can provide these forms in an application that is either provided as installed within a device as a Windows Forms application or hosted from a web server as a Web application. In this case, the forms are submitted manually, with validated data, with the inputs provided directly into other systems, such as an invoice processing system, or a tax processing system.
With 2, we can provide then forms as unstructured data, which is within PDFs or images. The key challenge with dealing with unstructured data is the process of detecting and recognising the data within the unstructured document. This is where the AI cognitive skills come into play. The cognitive skills are used to break the document apart (called cracking), then use skills like image recognition or optical character recognition, then extract words from the bounded regions that contain recognized text.
Prebuilt vs Custom Document Forms
Where we have fully trained, pre-built document models used, the extraction will be fast, as the locations of field prompts and input fields is fixed, with the only variable being the input values provided. Pre-built forms are usually standard forms whose structure and layout of fields, field names, inputs, and input selections are predefined for that type of form. These forms can include tax forms, identity application forms, passport application forms. These standard forms are usually specific to a particular country, and the input fields names will vary across jurisdictions. For example, variations in field names such as Sales Tax, VAT or GST make pre-built tax forms country or state specific.
When we have a requirement to build a custom document form that has different numbers of field names and inputs, with different positioning of these fields and inputs, then we may need to train a custom document model. The need to train a custom document model is determined by the level of success that we have when using an existing pre-built model. If the confidence levels that we have achieved when using prebuilt models on our input documents is unacceptable, then creating and training a custom document model is a recommended approach.
The Document Intelligence Model Training Process
As I mentioned, pre-built Document Intelligence forms are trained using hundreds and sometimes thousands of sample input documents. These documents vary in not just the values in each input field, but also in variations to fonts. Sometimes, the input document forms are scanned images with handwritten input values. Where inputs are handwritten, the training iterations and numbers of training samples will be higher to ensure that the accuracy of data recognition and resulting data extraction is higher.
Similarly, custom Document Intelligence models are required to be trained before they can be used to analyse and extract forms data from similarly structured input documents.
The training process begins with the uploading of training document forms files into a document intelligence project. Once uploaded, the document forms files can be previewed.
The next step in the process is to label document form elements, which include form field labels, field values, tables, and selection marks. The labelling process can either be done manually, or automatically. With the manual approach, it will take longer, but the accuracy may be higher, but there are likely to be manual labelling inaccuracies. With the automatic approach, the labelling will be quicker, but there may be inaccuracies dealing with exception cases.
Once all your documents are labelled, you can start creating a new document intelligence model, then start running training on the labelled document dataset.
After model training has completed, you can inspect the accuracy of the document elements of the model. This step allows you to go back and re-label any documents elements (field labels, field values, selection marks, tables etc), that have low levels of confidence from the test results. Following any re-labelling, the model can be re-trained with the re-labelled documents from the dataset.
Following the training, you can run a document analysis using the trained custom document intelligence model on a sample input document form. The results of the analysis include JSON files for the following extracted document elements:
Fields
Labels
OCR
Below is an encapsulation of the document intelligence custom model training process:
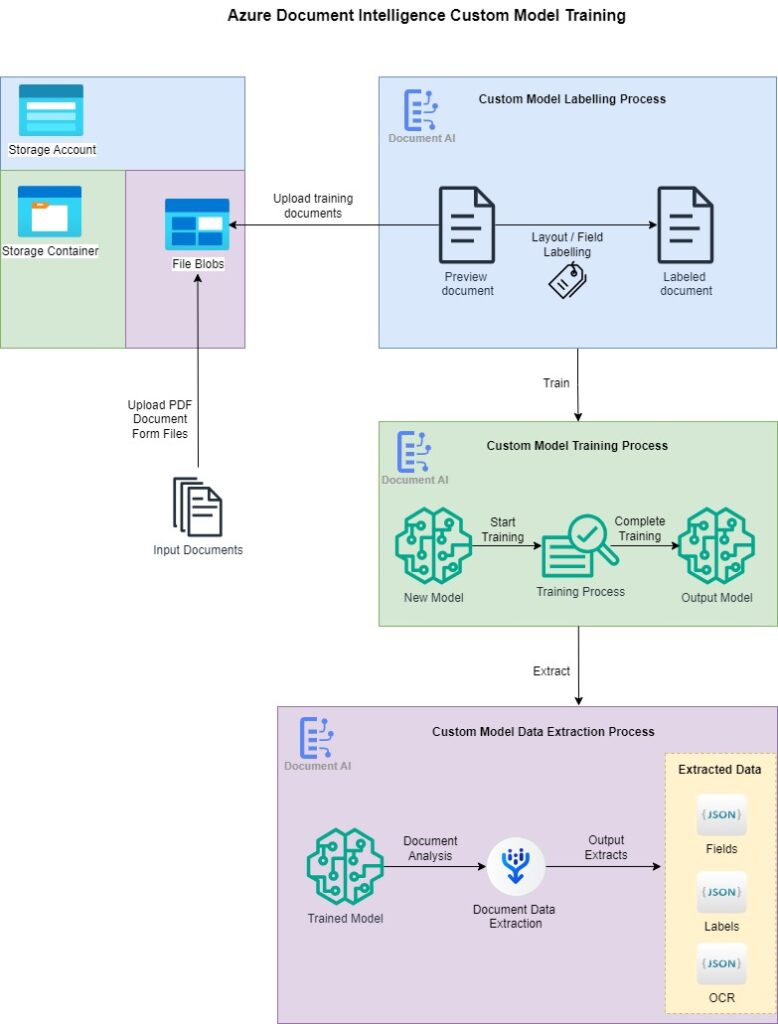
Below is a summary of the steps involved in the training process are:
- Upload the document form file training dataset.
- Label documents within the training dataset.
- Training a new model with the labelled training documents.
- Test the trained custom model.
- Run an extraction analysis using the model on sample document form file inputs.
In the next section, I will explain the requirements for training models with the Azure Document Intelligence Service.
Requirements for Training Custom Document Intelligence Models
In this section, I will cover what is required for you to create, label, training, test, and extract data from document forms.
Before you can train document intelligence models, you will require the following resources or tools:
Azure Subscription
Azure Document Intelligence resource
Azure AI Document Intelligence Studio
I will explain the above in the next two sub-sections.
Using Azure Document Intelligence Services
A prerequisite to using the Azure Document Intelligence Studio requires us to create the following resources:
- An Azure AI Service resource
- Azure Document Intelligence resource
In previous posts we used the Azure AI Service resource for Azure AI Search, Natural Language Processing, Vision, and Speech Processing resources.
Limits on the input requirements of documents will depend on the tier that we select when creating the Azure Document Intelligence resource.
An Azure AI Service resource is used to keep track of billing for the compute time or transactions of the Document Intelligence service that we are using to train, build and test document intelligence models.
Using the Azure Document Intelligence Studio
The Azure Document Intelligence Studio is a user-interface Azure portal application that is used to help us with the following training tasks:
- Create Document Intelligence Projects
- Upload Document Form Files
- Label Form elements of input documents
- Train Custom Document Intelligence Models
- Test Trained Document Intelligence Models
In the next section, I will show how to use the Document Intelligence Studio to construct, train, and test custom document intelligence models.
In the next few sections, I will show how to create, train and test a custom document form extraction model.
Custom Data Extraction Models in Azure Document Intelligence Studio
In this section, I will show how to use the Document Intelligence Studio to construct and configure a project that can be used to train, and test custom document intelligence models. I will also show how to provide the input training datasets that is needed for the document element labelling.
In the previous post, I showed how to analyze a document form using one of the prebuilt document intelligence models.
The difference between using the prebuilt model and a custom model are the additional steps, where we will label our training documents, create a new custom model, then train out custom model.
Training Datasets
Our datasets are sourced from a publicly accessible URL, which can also be from a blob file, that is stored within an Azure storage container.
We require a minimum of five files for training a custom model. Below is a sample set of documents uploaded into a storage container:
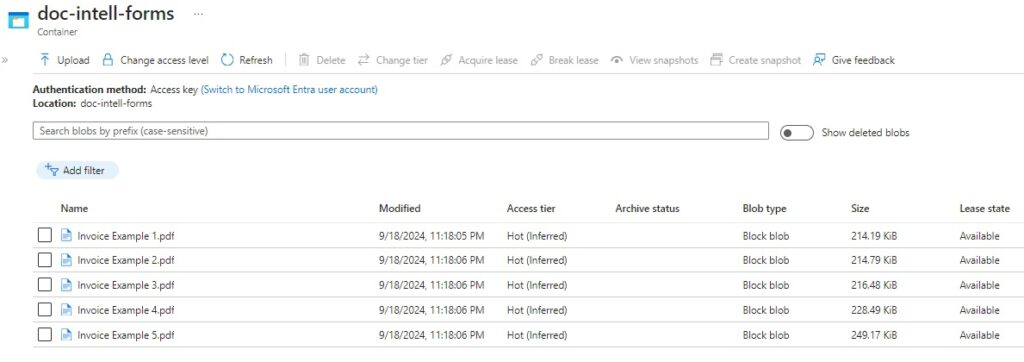
The documents I have used for training contain fictitious information unrelated to any real-world entities, addresses or individuals. In live production environments, where you will use tens and hundreds of training forms, they will likely contain real-world data, so be aware of privacy laws related to the storage and access of this data.
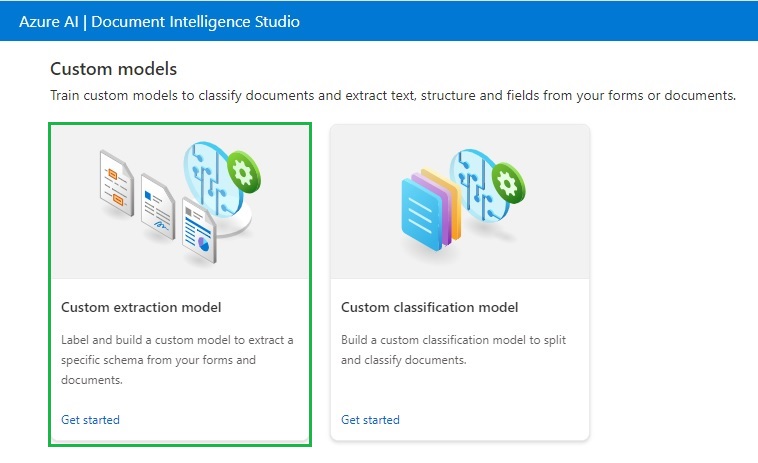
For document data extraction, we will need to select the option Custom extraction model from the available Custom models in the Document Intelligence Studio landing page:
Project Creation
Once the studio is opened, you will be able to create a new project. Click on the Create a project option under the My Projects grid:
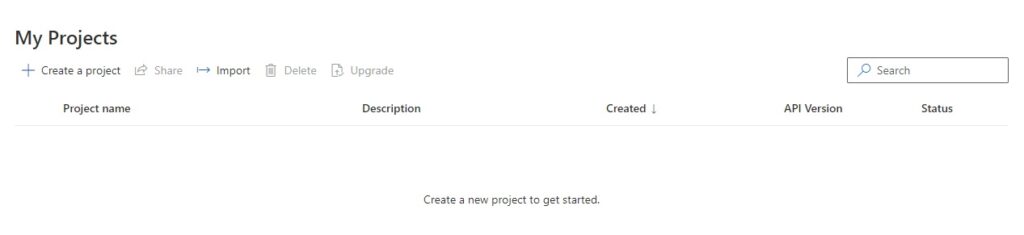
We will next configure the custom extraction model, which requires us to first specify the project details:
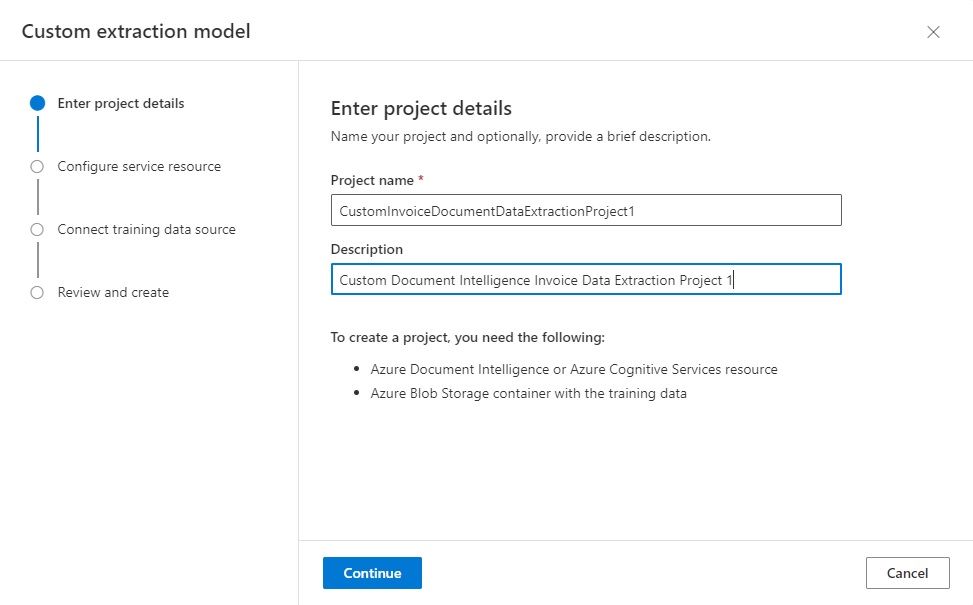
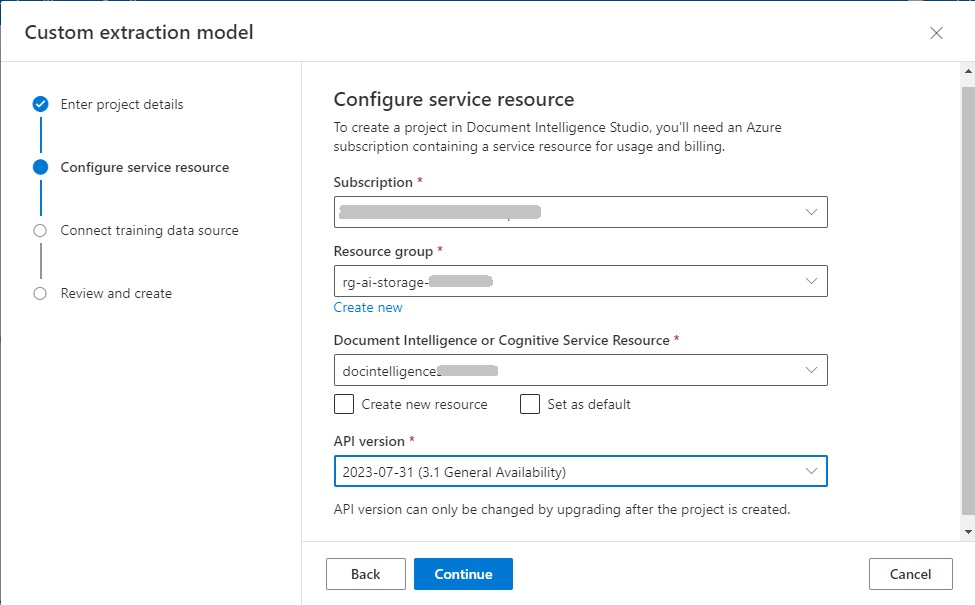
We then configure the service resource. This requires us to specify the subscription, resource group, document intelligence (or cognitive service) resource, and API version (defaulted):
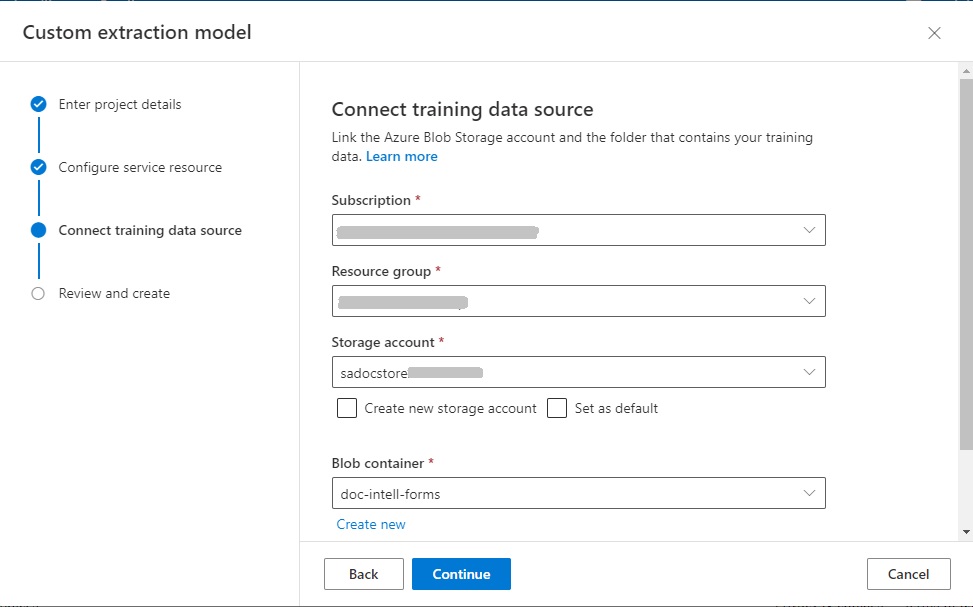
Next, we configure the connection to the training source, which requires us to specify the storage account and blob container:
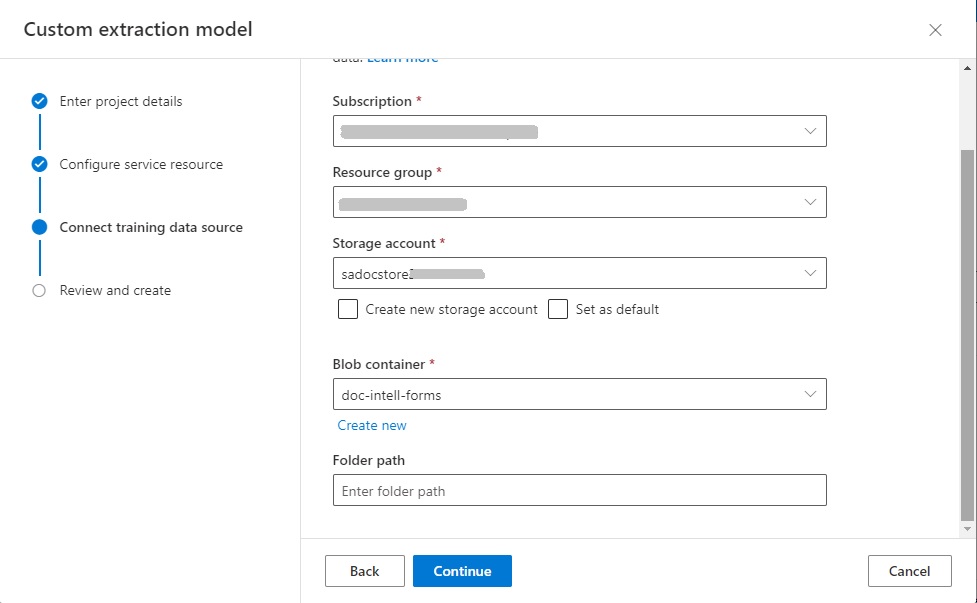
Optionally, we can specify a folder path within our blob container:
Once our custom extraction model project is configured, we can then start uploading files from our storage container and label them.
The other requirement of our storage account is to setup CORS (Cross-Origin Resource Sharing) between the Azure Storage Account (that contains the Storage Container that contains our training documents) and the Document Intelligence Service resource.
Configuration of CORS is done within the Settings menu in your Azure Storage account resource as shown:
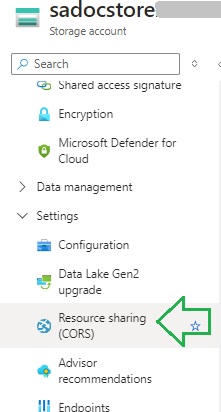
Then set the allowed origin to the endpoint of your Document Intelligence Service resource and allowed REST methods as shown:
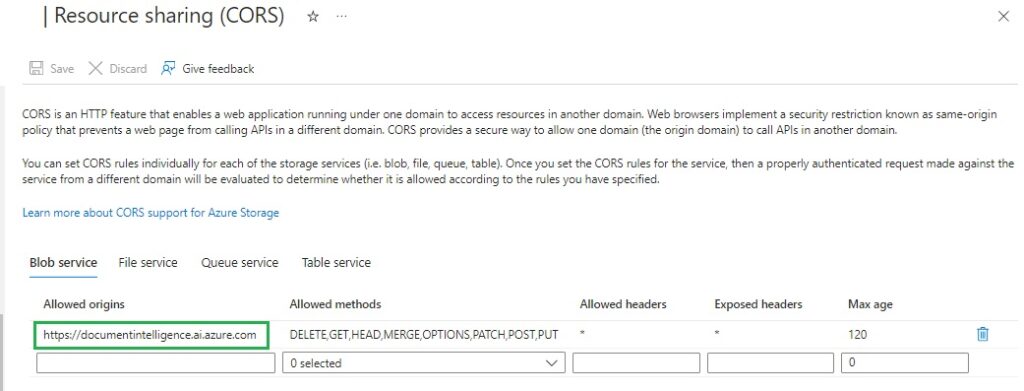
Then set the allowed origin to the endpoint of your Document Intelligence Service resource and allowed REST methods as shown:
Labelling Documents Elements within Training Datasets
In this section, I will show how to label form fields and tables of structures that are detected within each of the input document forms.
Labelling tables within training datasets
If you have setup your dataset source correctly, and the files are readable, you will see the thumbnails of the documents in the left panel.
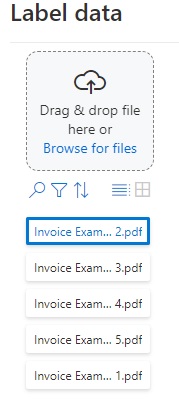
In the same panel, you can also manually upload training dataset document files by uploading or drag-drop operations:
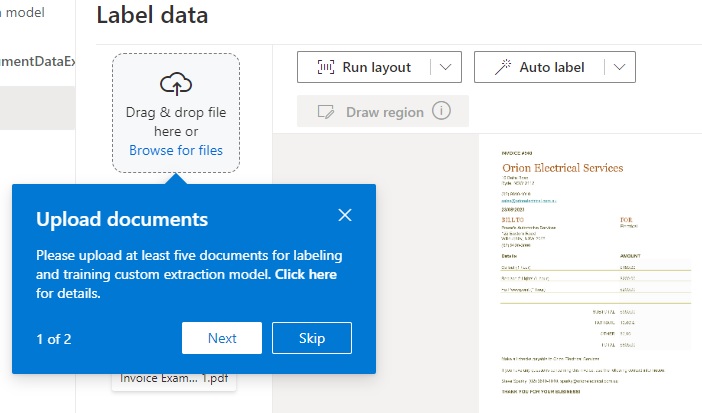
When you have at least one input file displayed and it is selected, you will be able to start labelling it. The labelling menu is located at the top of the document preview pane as shown:
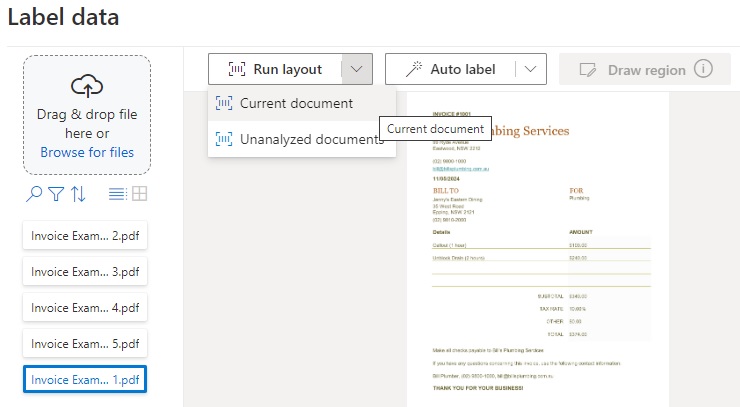
There are some options for you to consider. You can start by labelling the elements within each document individually or apply labelling to all the documents.
There are two types of labelling:
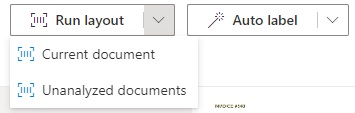
Run layout labelling
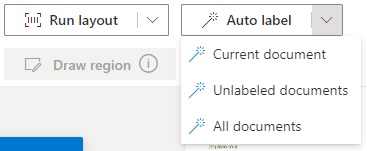
Auto labelling
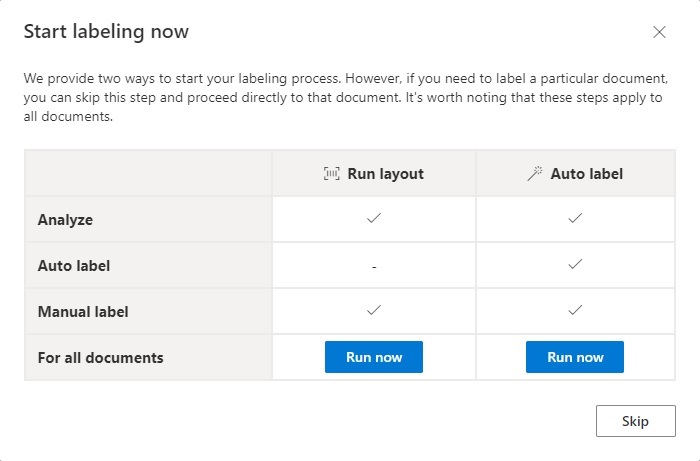
The Run layout labelling option labels the text and table layout information for each document.
The Auto labelling option automatically attempts to label the text within each document.
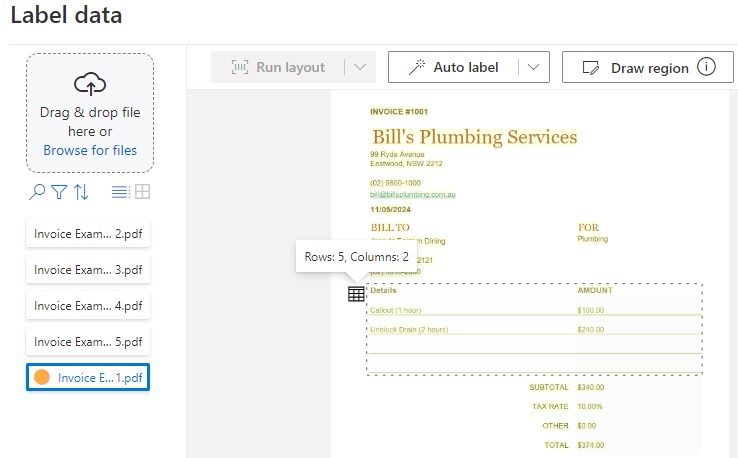
When the Run layout labelling option is actioned for the current document, you will see any tables in the first page identified and highlighted as shown:
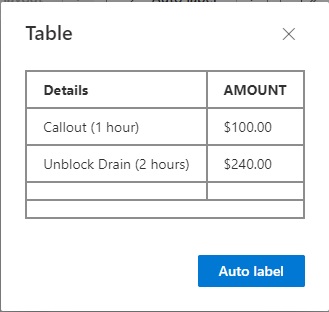
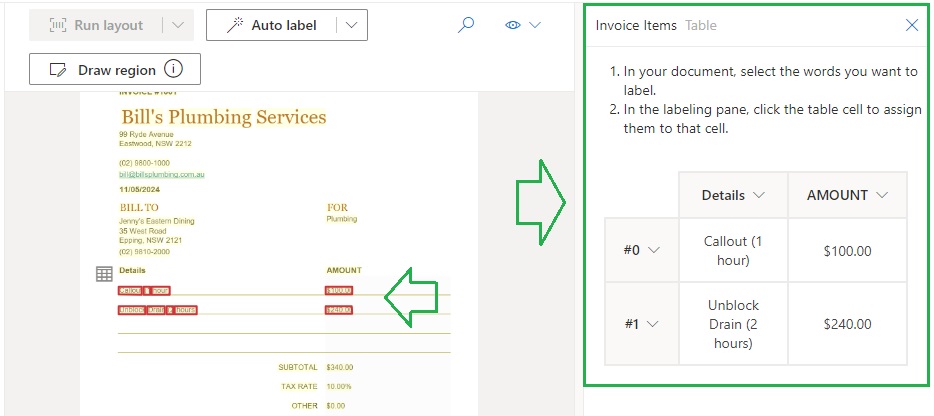
When selecting the highlighted table, you will see the table column, row headers, and cell values extracted on the right pane as shown:
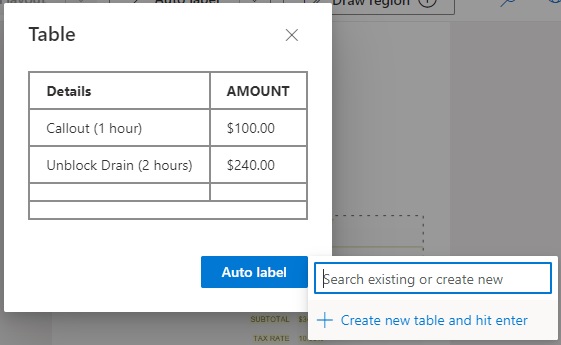
When selecting the auto label button, you will see a drop-down context menu showing a search box and an option to create a new table:
After selecting the new table option, we are taken to the following Table Labelling dialog:
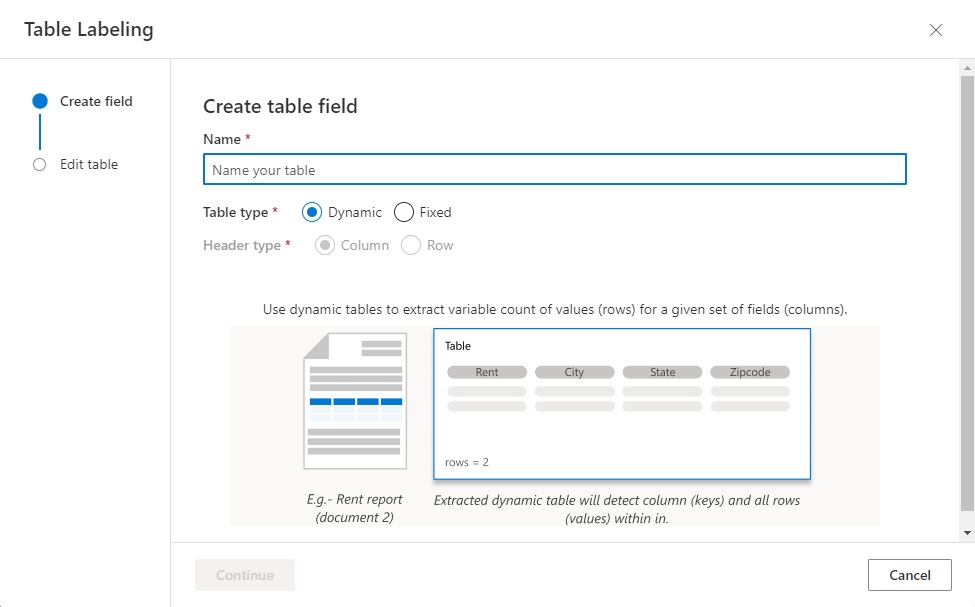
There are two table types to consider when creating the table field.
Dynamic
Fixed
With Dynamic table types, there are fixed columns with variable numbers of rows.
With Fixed table types, there are fixed columns and rows.
We can also select from a Header type of Column or Row.
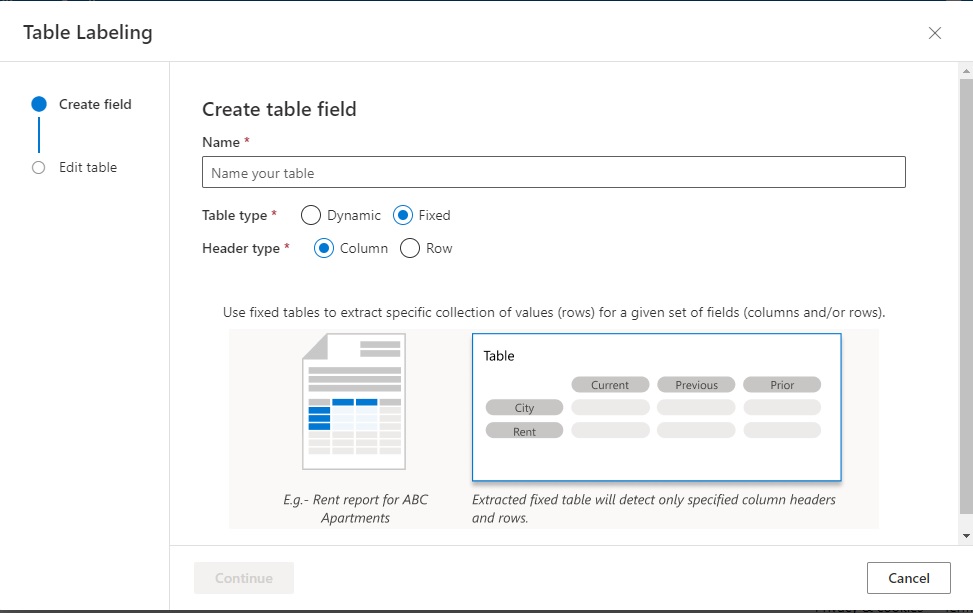
We then enter a name for our table. In this table, I selected the Dynamic table type with a Column header type.
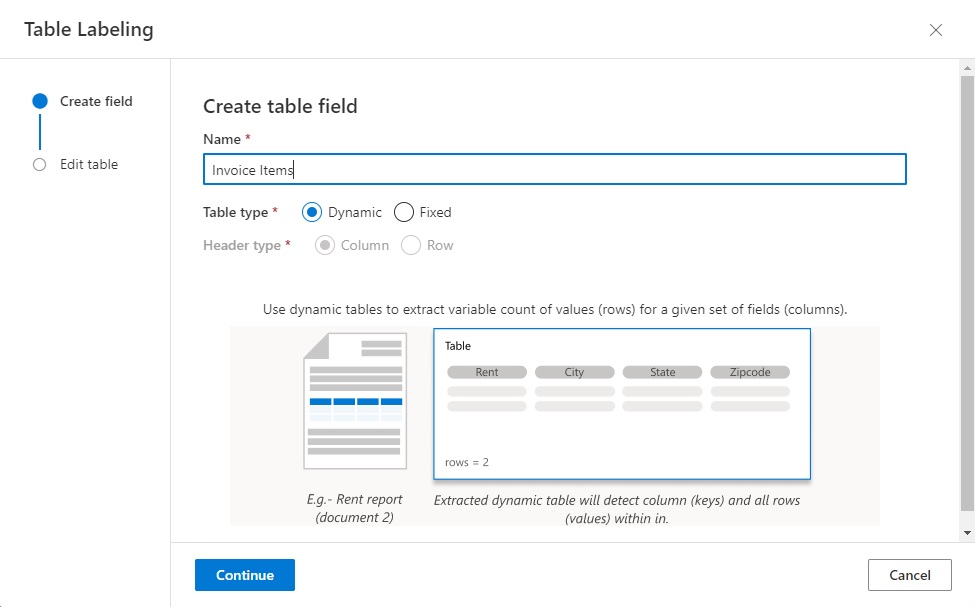
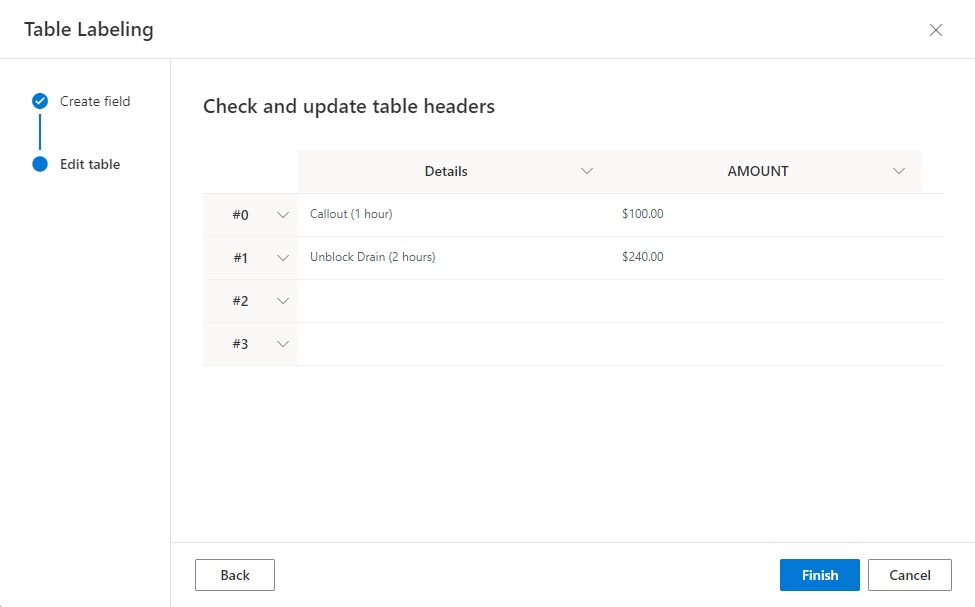
In the next screen in the table labelling wizard, we can optionally edit the table:
After the table labelling is finished, we can see the labelled table in the right pane as shown:
Our next part of the document labelling process is to label the fields within the document.
Labelling fields within training datasets
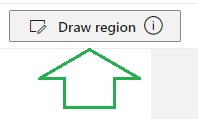
To define fields within a document, you will need to draw out a rectangular region. This is done using the Draw region action shown below:
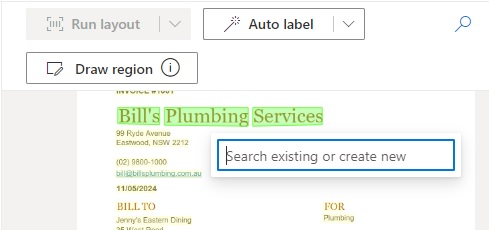
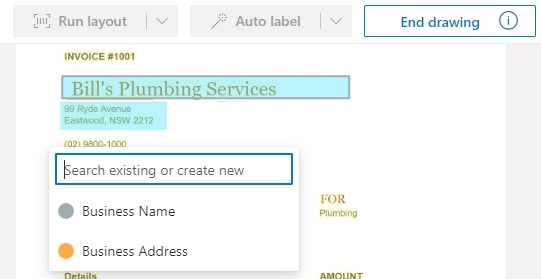
After a region is drawn out with the mouse, you will see a context menu showing a text box and an action to add a new field:
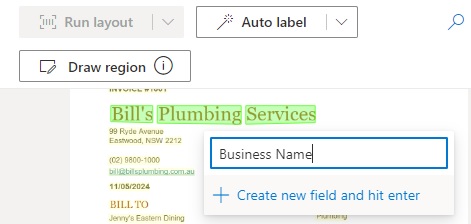
After typing in a new field name and pressing enter, you will see the context menu items change to show a Field, Selection Mark and Signature as shown:
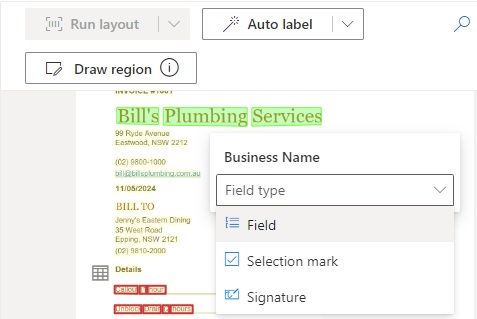
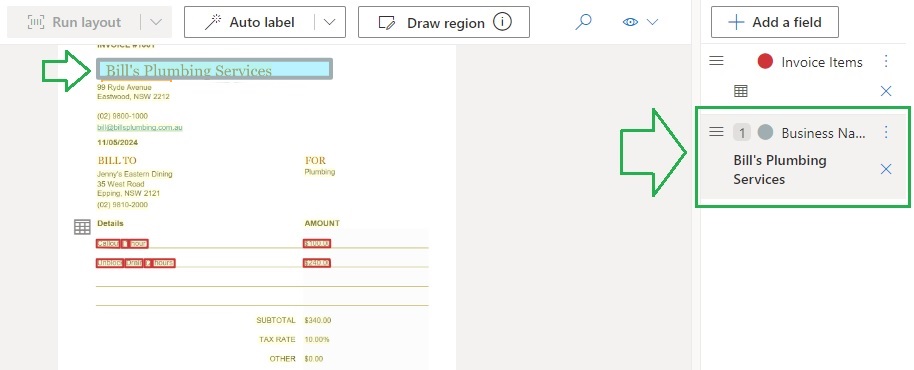
After selecting the Field menu option, you will see a new field displayed to the right pane with the content of the region as shown:
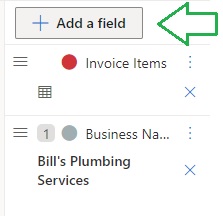
Another way to add new field definitions is to use the Add a field button in the right pane:
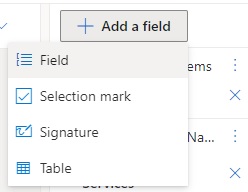
After clicking the action, a drop-down item menu appears with the Field, Selection mark, Signature and Table options:
After selecting the Field option, you will see the Draw region action appear above the preview region:
You can then define the region that defines the location of the new document field, which can then be selected from the list of existing field names:
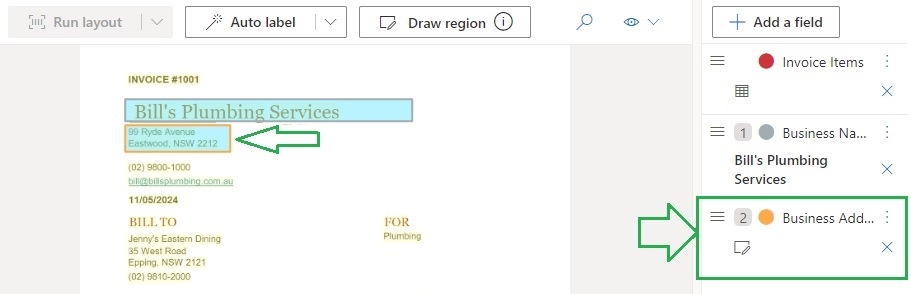
After the field and region are defined, selection of the region will highlight the corresponding field in the right pane:
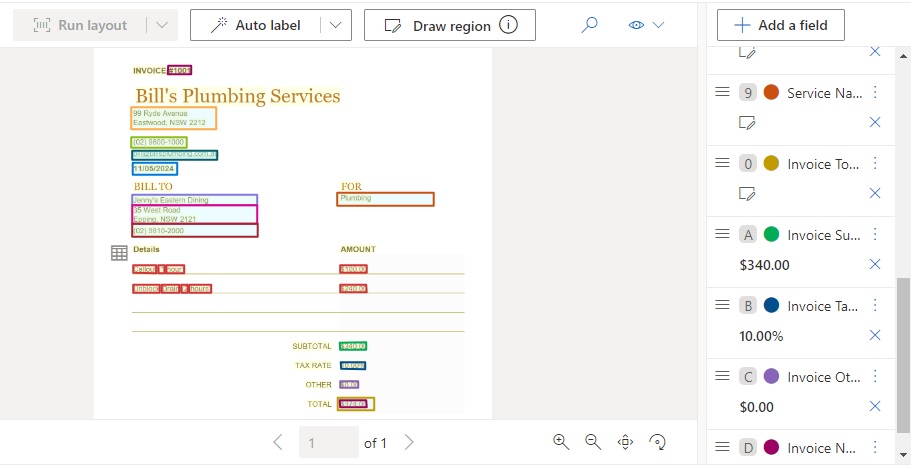
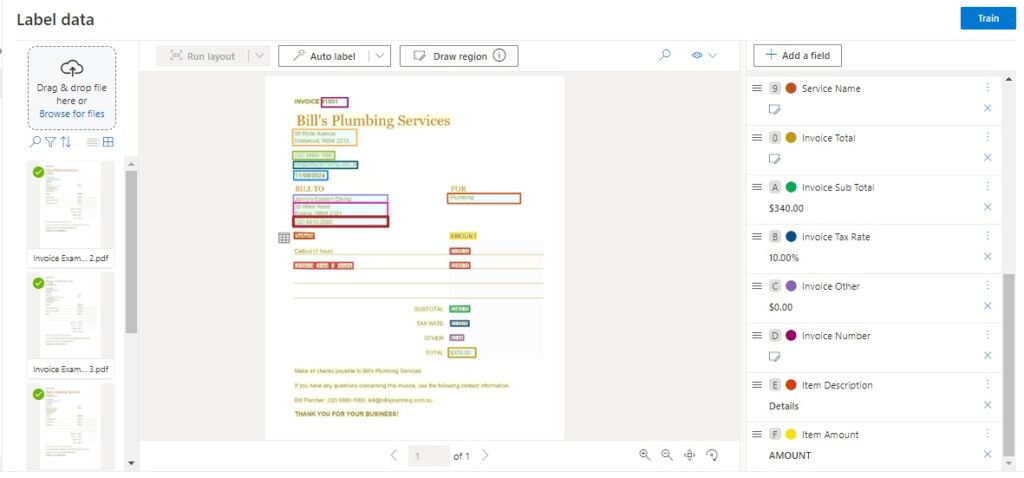
After repeating the above tasks to define new fields, you will see all the fields highlighted in the document preview pane, and the corresponding field definitions to on the right pane:
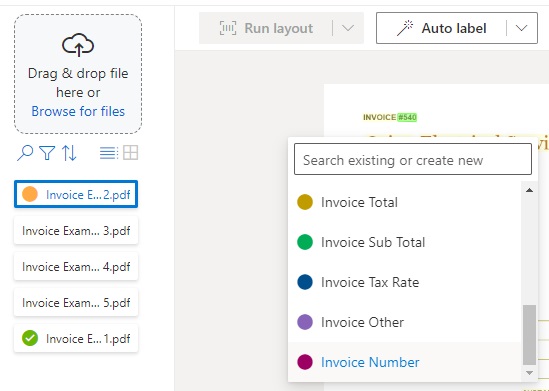
You can then repeat the labelling procedure by selecting another document form file from the left pane. You will then notice that the field definitions that were created during the labelling of the first document available when you select any text or draw out a region:
In the next section, I will show how to train and test the custom model.
Training and Testing the Custom Model
After you have labelled at least five of the document forms, you should see the option to commence model training appear in the top right corner of the labelling area with the Train button:
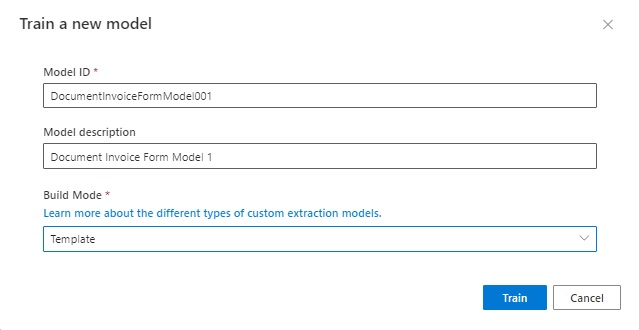
When the training process is started, you will see the configuration dialog to train a new model, where you enter a Model ID, Model description, and a Build Mode:
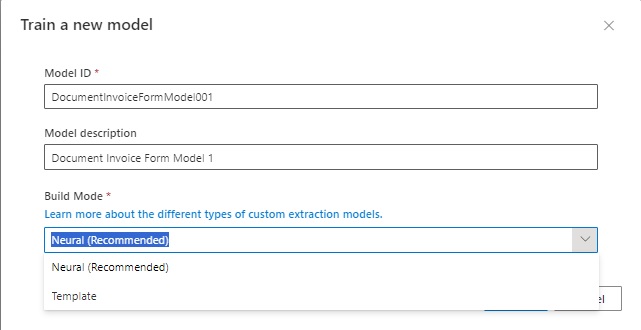
The two build modes are:
Neural
Template
The Neural build model is used for forms where the page structure of the form can vary across documents based on inputs.
The Template build model is used for forms where the page structure of the form is the same across documents.
The documents I have used for the training dataset all have fixed page structures across different forms, so I use the Template build model:
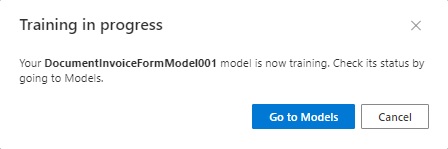
While the training run is in progress, you will then have the option to go to the models:
In the Models view, you will see each model, its version, creation date and time, and its status:

After the model training run is completed, you can select it, and a dialog will show with each field name and its accuracy:
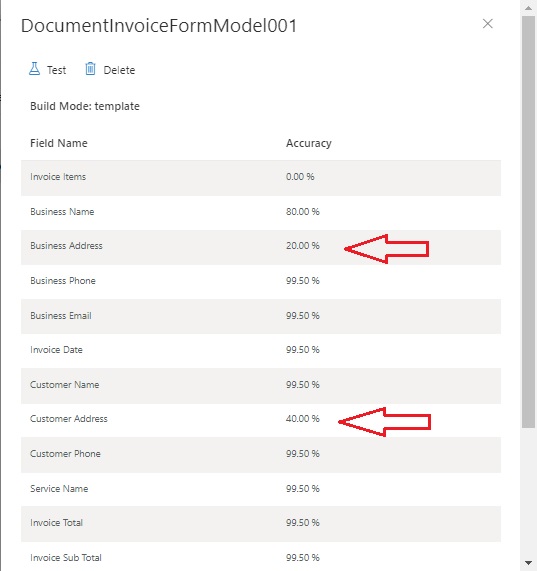
Where the accuracy is quite noticeably low (below the average of the other fields), you can review the labelled training documents and see if there are any improvements that can be made for labelling, which may improve future training runs.
It is quite possible that some field extraction accuracies cannot be improved as their positioning overlaps other adjacent fields in the document form after the document form in a non-PDF format, such as Excel is converted to a PDF and then to a preview image before the OCR run.
Testing the Trained Custom Model
After your custom document intelligence model has been trained, you can then run some test inputs on the model. In the left pane, after selecting the Test menu item, you will see the Test model screen:
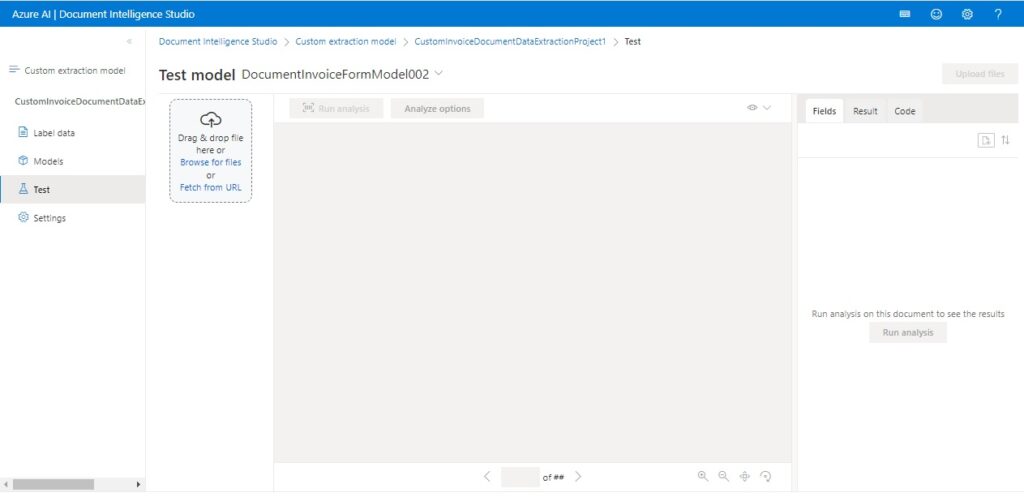
To run a test, you will need to upload a sample document form file. After that is uploaded, the Run analysis button will appear:
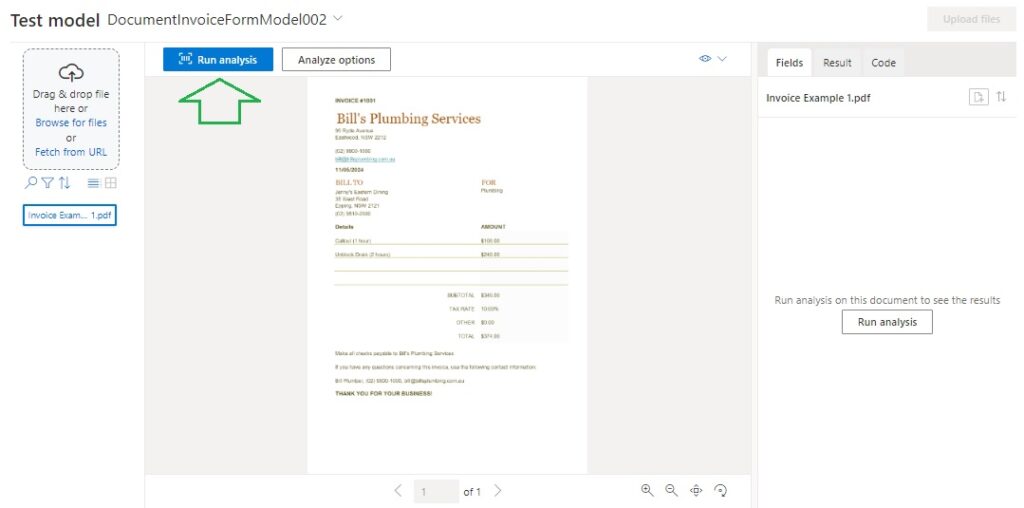
After execution of the analysis run, you will see the output results of the run appear in the right pane in the sub-tabs Fields and Result. In the Fields tab, you will see each extracted field and its associated confidence level.
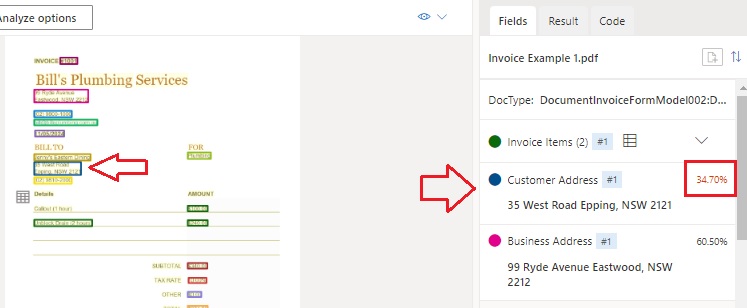
After the training run, we noticed the accuracy of the customer address field was 40%. In the test, we see the accuracy of extraction is 34.70%.
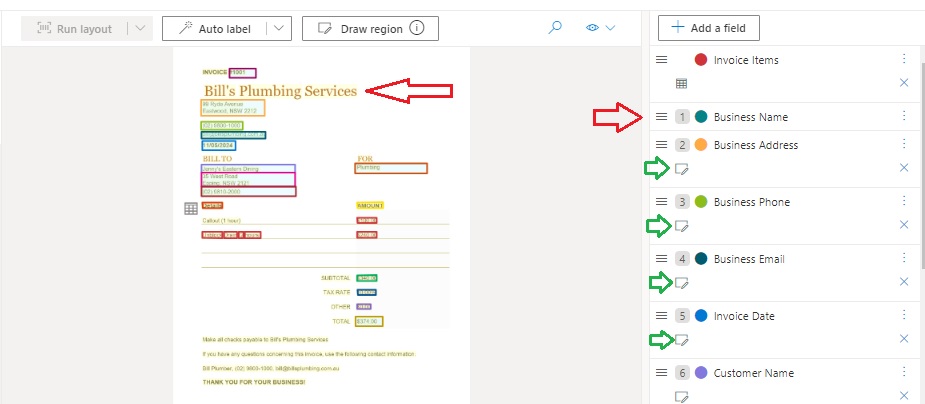
You may also notice some fields to the right having a (Not found) label. In this case, the field corresponding to the Business Name field was mis-labelled.
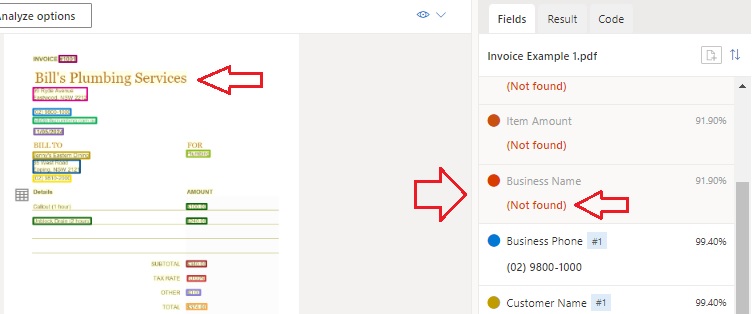
Returning to the corresponding input document form, we can see the label for the Business Name field is shown to the right without the note icon that is associated with the other correctly labelled document fields.
The Result sub-tab shows the results of the training run in JSON format. It is quite a lengthy definition spanning tens and hundreds of pages.
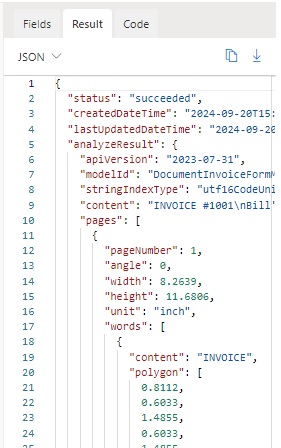
The results include a header, then an array of extracted pages, with an array of words under that:
{
    "status": "succeeded",
    "createdDateTime": "2024-09-20T15:28:03Z",
    "lastUpdatedDateTime": "2024-09-20T15:28:04Z",
    "analyzeResult": {
        "apiVersion": "2023-07-31",
        "modelId": "DocumentInvoiceFormModel003",
        …
        "pages": [
            {
                "pageNumber": 1,
                "angle": 0,
                "width": 8.2639,
                "height": 11.6806,
                "unit": "inch",
                "words": [
                    {
                        "content": "INVOICE",
                        "polygon": [
                            0.8112,
                            0.6033,
                            1.4855,
                            0.6033,
                            1.4855,
                            0.7807,
                            0.8061,
                            0.7807
                ],
                "confidence": 0.995,
                "span": {
                    "offset": 0,
                    "length": 7
                }
            },
            …
        }
    ],
    ...
The detected elements include an array of tables, which includes the rows and columns:
"tables": [
    {
        "rowCount": 5,
        "columnCount": 2,
        "cells": [
            {
                "kind": "columnHeader",
                "rowIndex": 0,
                "columnIndex": 0,
                "content": "Details",
                "boundingRegions": [
                    {
                        "pageNumber": 1,
                            "polygon": [
                                0.731,
                                4.2729,
                                5.0767,
                                4.2729,
                                5.0767,
                                4.6171,
                                0.731,
                                4.6171
                            ]
                    }
                ],
                "spans": [
                    {
                        "offset": 214,
                        "length": 7
                    }
                ]
            },
            …
        ],
        "boundingRegions": [
            {
                "pageNumber": 1,
                "polygon": [
                    0.7372,
                    4.2688,
                    7.7146,
                    4.2698,
                    7.7136,
                    6.1615,
                    0.7348,
                    6.1608
                ]
            }
        ],
        "spans": [
            {
                "offset": 214,
                "length": 71
            }
        ]
    }
],
The remaining extracted array structures include styles and documents, with their styles and fields. Each detected field will have a confidence level:
"styles": [],
"documents": [
    {
        "docType": "DocumentInvoiceFormModel003:DocumentInvoiceFormModel003",
        "boundingRegions": [
        {
            "pageNumber": 1,
            "polygon": [
                0,
                0,
                8.2639,
                0,
                8.2639,
                11.6806,
                0,
                11.6806
            ]
        }
        ],
        "fields": {
            "Invoice Other": {
                "type": "string",
                "valueString": "$0.00",
                "content": "$0.00",
                "boundingRegions": [
                {
                    "pageNumber": 1,
                    "polygon": [
                        5.11,
                        7.15,
                        5.485,
                        7.15,
                        5.485,
                        7.29,
                        5.11,
                        7.29
                    ]
                }
                ],
                "confidence": 0.995,
                    "spans": [
                    {
                        "offset": 325,
                        "length": 5
                    }
                ]
            },
            …
        }
    },
    "confidence": 0.8,
    "spans": [
        {
            "offset": 0,
            "length": 571
        }
    ]
}
]
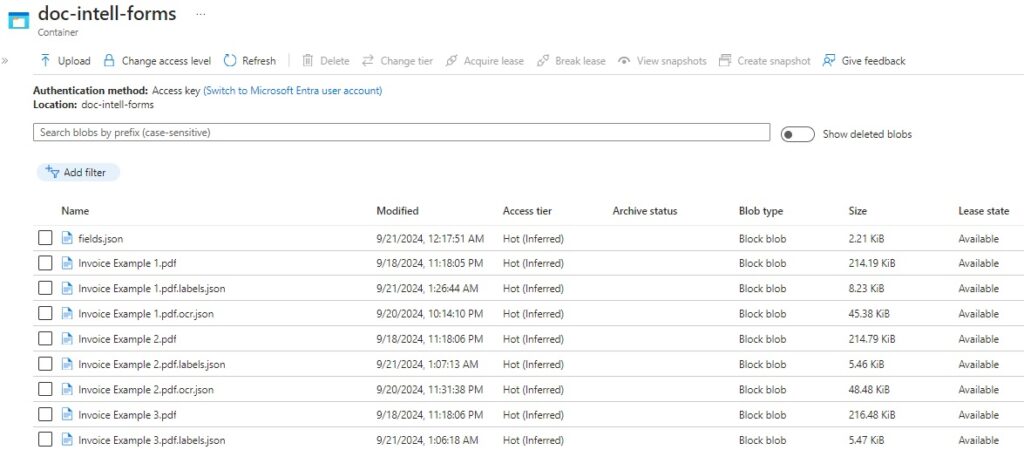
You can also retrieve the extracted results from within the storage container of the document intelligence custom extraction model. These are the fields.json file and *.labels.json and *.ocr.json files for each input PDF document form:
We have seen how to train and test a document intelligence custom data extraction model.
In the next post I will show how to use the Azure Document Intelligence SDK to run analysis on sample documents within a client application.
That is all for today’s post.
I hope that you have found this post useful and informative.

Andrew Halil is a blogger, author and software developer with expertise of many areas in the information technology industry including full-stack web and native cloud based development, test driven development and Devops.
